Rustic Blackberry Galette Delight: A Simple Yet Elegant Dessert
When it comes to desserts that blend simplicity with elegance, few can rival the rustic charm of a galette. This French pastry, often described as a free-form tart, captures the essence of seasonal fruits with minimal fuss and maximal flavor. The Rustic Blackberry Galette Delight is a prime example of this delightful dessert, showcasing the rich, tart flavor of fresh blackberries enveloped in a buttery, flaky crust. Whether served warm with a dollop of whipped cream or at room temperature, this galette promises to impress your family and friends while offering a taste of homemade goodness.
The appeal of the Rustic Blackberry Galette lies not only in its delectable taste but also in its straightforward preparation. Unlike traditional pies that require precise crimping and a perfectly fitted crust, galettes embrace an imperfect, rustic aesthetic that celebrates the beauty of homemade baking. This makes them the perfect choice for both novice bakers and seasoned pastry chefs alike. By using fresh ingredients, you can elevate the flavors and textures, ensuring that every bite is an experience to savor.
In this article, we will delve into the world of galettes, exploring their history and what makes them unique. We will also discuss the key ingredients that contribute to the Rustic Blackberry Galette Delight, highlighting the importance of freshness and quality. Finally, we will guide you through the initial steps of preparing the delectable blackberry filling that will be the star of your galette.
Understanding the Galette
To fully appreciate the Rustic Blackberry Galette, it helps to understand what a galette truly is. In the realm of French cuisine, a galette is a versatile pastry that can be sweet or savory, typically characterized by its free-form shape. Unlike traditional pies and tarts that are baked in a dish, galettes are simply folded over the filling and baked on a baking sheet, allowing for a more rustic appearance. This lack of formality is part of their charm, as they showcase the ingredients in a more organic manner.
The history of galettes can be traced back to the Breton region of France, where they were originally made with buckwheat flour and filled with savory ingredients like cheese and vegetables. Over time, the concept has evolved, leading to the sweet versions we enjoy today, often filled with seasonal fruits. The beauty of galettes lies in their adaptability; they can be made with a variety of fillings, making them an excellent choice for showcasing whatever fruits are in season.
In comparison to other desserts, such as pies and tarts, galettes possess a unique appeal. While pies typically require a top and bottom crust, which can be labor-intensive, galettes offer a more relaxed approach. Their rustic nature allows for creative expression, where the dough can be rolled out quickly, and the filling can be heaped in without concern for perfection. This makes galettes not only approachable for home bakers but also a reflection of the current trend towards simpler, more accessible desserts.
Seasonal fruits are at the heart of every galette, and the Rustic Blackberry Galette is no exception. Blackberries, with their deep purple hue and complex flavor profile, are a natural choice for this dessert. Their tartness provides a lovely contrast to the sweetness of the sugar, making each bite an explosion of flavor. The use of fresh ingredients is crucial, as they not only enhance the taste but also contribute to the texture, ensuring that the galette is as enjoyable to eat as it is to behold.
Ingredients Breakdown
Creating the perfect Rustic Blackberry Galette Delight begins with understanding the ingredients that will make it shine. Below is a detailed description of each component that contributes to this delightful dessert.
– Fresh Blackberries: At the core of this galette are the blackberries themselves. Not only do they provide a burst of flavor, but they are also rich in antioxidants, vitamins, and fiber. When selecting blackberries, look for plump, shiny berries without any signs of mold or bruising. Their natural sweetness, combined with a hint of tartness, makes them an ideal filling for this rustic dessert.
– Granulated Sugar: Sugar plays a vital role in balancing the tartness of the blackberries. It enhances their natural sweetness while also helping to create a syrupy filling as the galette bakes. Using granulated sugar in moderation ensures that the flavor of the blackberries remains the star of the show.
– Lemon Juice: A splash of lemon juice not only brightens the flavor of the filling but also helps prevent the blackberries from browning. The acidity of the lemon complements the sweetness of the sugar and the tartness of the berries, creating a well-rounded filling.
– Cornstarch: To achieve the perfect consistency for the fruit filling, cornstarch is essential. It acts as a thickening agent, absorbing the juices released by the blackberries during baking. This ensures that the filling holds its shape when cut, rather than becoming a soupy mess.
– Vanilla Extract: Adding a splash of vanilla extract introduces depth and warmth to the flavor profile of the galette. It enhances the natural sweetness of the blackberries, creating a more complex and inviting filling.
– Salt: A pinch of salt is a secret ingredient that balances the sweetness of both the filling and the crust. It enhances the overall flavor and brings out the best in the other ingredients.
– Flour and Butter: The foundation of a flaky crust lies in the combination of all-purpose flour and cold butter. The flour provides structure, while the butter, when cut into the flour, creates the layers necessary for a tender and flaky texture. Using high-quality butter can significantly impact the flavor of the crust.
– Ice Water: To bring the dough together, ice water is added. This is crucial in preventing gluten formation, which can make the crust tough. The cold water helps keep the butter solid as you work, leading to a flakier result.
– Egg Wash and Coarse Sugar: For a beautiful finish, an egg wash applied before baking gives the crust a golden color, while a sprinkle of coarse sugar adds a delightful crunch and extra sweetness to the top.
Preparing the Blackberry Filling
With a better understanding of the ingredients, it’s time to dive into the preparation of the blackberry filling. This step is crucial for developing the flavors and ensuring a satisfying texture in the final galette.
Begin by rinsing the fresh blackberries under cold water and gently patting them dry with a paper towel. This step is essential to remove any dirt or residue while preserving the integrity of the berries. Once cleaned, place the blackberries in a mixing bowl and sprinkle them with granulated sugar, lemon juice, cornstarch, vanilla extract, and a pinch of salt. Gently toss the mixture together, being careful not to crush the berries. Allow the filling to sit for about 15-20 minutes. This resting period is vital as it allows the sugar to draw out the juices from the blackberries, creating a flavorful syrup that will enhance the filling’s texture and taste.
By allowing the filling to sit, you not only encourage the flavors to meld together but also ensure that the cornstarch has time to absorb the berry juices, preventing the filling from becoming too runny during baking. This patience will pay off when you slice into the galette and reveal a perfectly set filling that showcases the vibrant color and natural beauty of the blackberries.
Stay tuned as we continue this journey into the art of creating the Rustic Blackberry Galette Delight, guiding you through the process of assembling and baking this delicious dessert that is sure to become a favorite in your household.
Techniques for Handling Delicate Blackberries to Avoid Bruising
Blackberries are one of the most delightful fruits to work with, but they can be quite delicate. To ensure your rustic blackberry galette retains the perfect texture and flavor, it’s crucial to handle these berries with care. Here are some techniques to avoid bruising:
1. Gentle Washing: When washing blackberries, use a colander and rinse them under cold water. Avoid soaking them, as this can lead to waterlogged berries. Instead, gently toss them with your hands to remove dirt without squishing the fruit.
2. Drying: After rinsing, lay the berries on a clean kitchen towel or paper towel to dry. Pat them gently to remove excess moisture, which can help prevent them from becoming mushy during cooking.
3. Careful Handling: Transfer the blackberries with a spoon or your hands, supporting them from underneath to avoid crushing. When adding them to your galette filling, do so gently.
4. Sorting: Before using, sort through your blackberries to remove any that are overly soft or damaged. This will help ensure a fresher flavor and better texture in your galette.
Creating the Perfect Flaky Crust
Why a Flaky Crust is Essential for a Successful Galette
A flaky crust is the foundation of any successful galette. It offers a delicious contrast to the juicy filling, providing a satisfying texture that enhances the overall taste of the dessert. A well-made crust should be light, flaky, and buttery, allowing the blackberries to shine.
Tips on Incorporating Butter into the Flour for Texture
When making the dough, the way you incorporate butter is crucial for achieving the desired flakiness. Here’s how to do it effectively:
1. Chilled Ingredients: Use cold butter straight from the refrigerator. Cold butter helps create steam during baking, which results in that coveted flaky texture.
2. Cutting in the Butter: Use a pastry cutter, two forks, or your fingertips to cut the butter into the flour. Aim for pea-sized pieces; this method helps distribute the fat evenly without melting it, which is key to creating layers in the crust.
3. Avoid Overworking: Mix until the dough just comes together. Overworking the dough can lead to a tough crust, so be gentle to maintain the integrity of the butter.
Importance of Temperature in Pastry Making
Temperature plays a vital role in pastry making. Keeping your ingredients cold ensures that the butter remains solid until it’s time to bake. Here are a few tips:
1. Chill the Bowl: For extra precaution, you can chill the bowl and utensils you use to make the dough. This helps maintain the cold temperature of the butter.
2. Resting the Dough: After mixing the dough, wrap it in plastic wrap and refrigerate for at least 30 minutes. This resting period allows the gluten to relax, resulting in a more tender crust.
Step-by-Step on Forming and Chilling the Dough
1. Mix the Dry Ingredients: In a mixing bowl, combine flour, sugar, and salt.
2. Add the Butter: Cut the chilled butter into the dry ingredients until it resembles coarse crumbs.
3. Add Water: Gradually add ice water, one tablespoon at a time, mixing until the dough forms.
4. Form the Dough: Turn the dough onto a lightly floured surface and knead it gently just until it comes together.
5. Chill: Shape the dough into a disk, wrap it in plastic wrap, and refrigerate for at least 30 minutes.
Assembling the Rustic Galette
Visual and Descriptive Guidance on Rolling Out the Dough
Once your dough has chilled, it’s time to roll it out. Here’s how to do it effectively:
1. Flour the Surface: Lightly flour your work surface to prevent sticking.
2. Rolling Technique: Start from the center of the dough and roll outward, rotating the dough a quarter turn after each roll. This helps maintain a circular shape.
3. Target Thickness: Aim for a thickness of about 1/8 inch. The dough should be sturdy enough to hold the filling without tearing.
Techniques for Filling and Folding the Crust to Achieve a Rustic Look
1. Transfer the Dough: Carefully lift the rolled-out dough and place it onto a baking sheet lined with parchment paper.
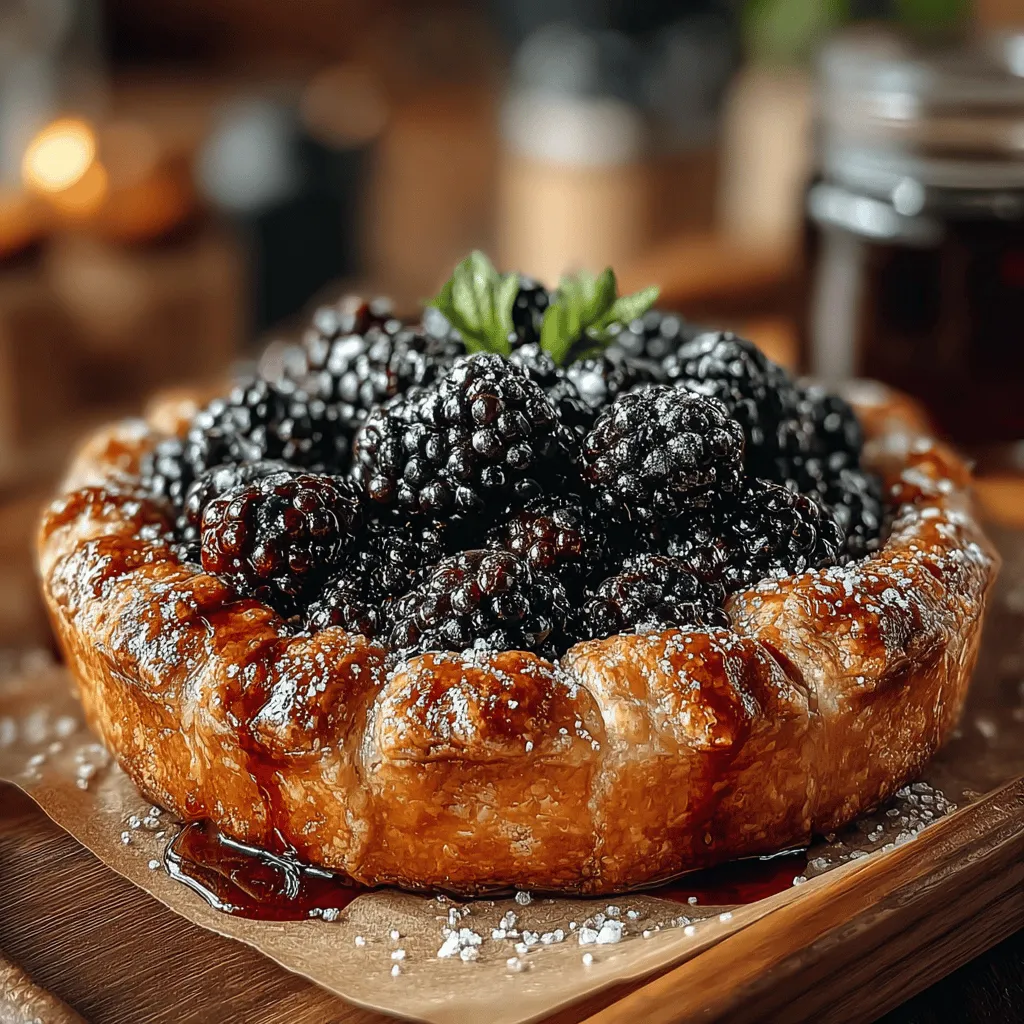
2. Add the Filling: Spread the blackberries in the center of the dough, leaving about a 2-inch border. You can sprinkle some sugar and a dash of lemon juice over the berries for added flavor.
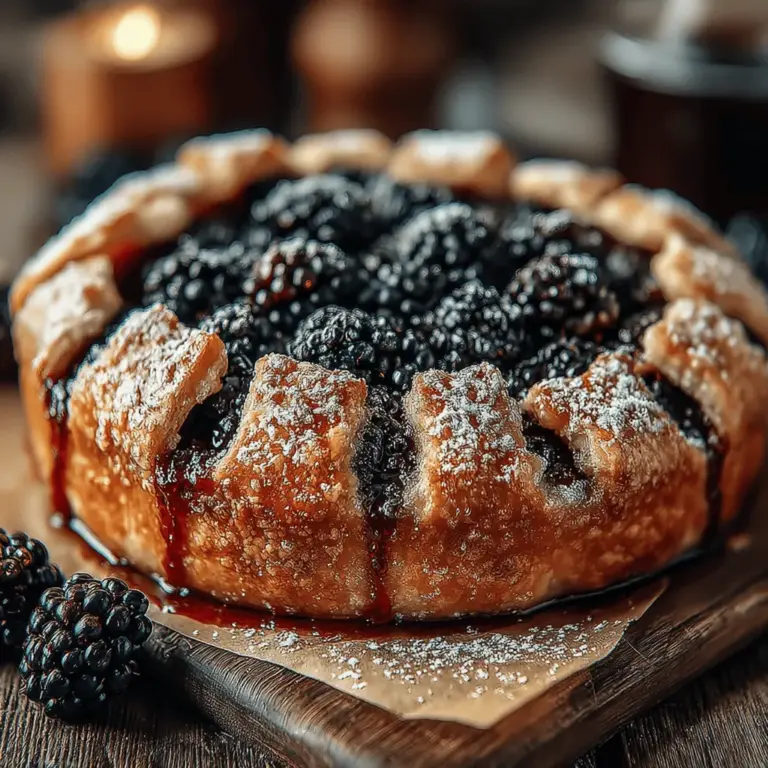
3. Folding the Crust: Gently fold the edges of the dough over the filling, pleating as you go. Don’t worry about making it perfect; the rustic charm comes from these imperfections.
4. Brush and Sprinkle: Brush the exposed crust with an egg wash (a beaten egg mixed with a tablespoon of water) for a golden finish, and sprinkle with coarse sugar for added crunch.
Embracing Imperfections for a Homestyle Feel
One of the beauties of a galette lies in its rustic appearance. Embrace any imperfections in the folding and shaping of the crust; they contribute to the homemade, cozy feel of the dessert. This is not a meticulously decorated cake but a warm, inviting treat meant to be shared.
Baking the Galette
Importance of Preheating the Oven and Using Parchment Paper
Preheating your oven is crucial for even baking. Set your oven to 400°F (200°C) and allow it to reach the desired temperature before placing your galette inside. Parchment paper not only prevents sticking but also makes for easy cleanup.
Signs to Look for to Determine if the Galette is Done Baking
1. Golden Brown Crust: The crust should be a beautiful golden brown, indicating that it has baked properly.
2. Bubbling Filling: You should see the blackberry filling bubbling slightly, which is a good sign that the fruit is cooked through.
3. Firm Center: Gently shake the baking sheet. If the filling jiggles slightly but the crust is firm, your galette is ready.
Discussing Variations in Baking Time Based on Oven Types
Keep in mind that baking times may vary based on your oven type. Conventional ovens may bake faster than convection ovens. Generally, the galette should take about 25-35 minutes to bake, but always keep an eye on it as it approaches the end of the cooking time. Use the visual cues described above to guide you.
Serving Suggestions
Ideas for Serving the Galette
1. A La Mode: Serve warm slices of the galette with a scoop of vanilla ice cream. The contrast of warm and cold creates a delightful experience.
2. Whipped Cream: A dollop of lightly sweetened whipped cream adds a lovely creaminess and balances the tartness of the blackberries.
3. Fresh Mint: Garnish with fresh mint leaves for a pop of color and a refreshing aroma.
Suggesting Seasonal Variations with Other Fruits
While blackberries are delightful, consider experimenting with other fruits depending on the season. Peaches, apples, or even mixed berries can be fantastic alternatives. Just be mindful of the moisture content in the fruits, and adjust the sugar and cornstarch accordingly to maintain the right consistency.
Presentation Tips for a Beautiful Dessert Display
For an appealing presentation, cut the galette into wedges and arrange them on a rustic wooden board. You can sprinkle some powdered sugar on top for a touch of elegance, and serve with your chosen accompaniments in small bowls alongside.
Nutritional Information
Overview of the Nutritional Benefits of Using Blackberries
Blackberries are not only delicious but also packed with nutritional benefits. They are rich in antioxidants, vitamins C and K, and dietary fiber, making them a healthy choice for dessert. These nutrients contribute to overall health and may reduce the risk of chronic diseases.
Discussion on Portion Sizes and Indulgence
While the rustic blackberry galette is a treat, portion control is essential. A standard serving size is typically one slice, which provides a satisfying experience without overindulgence. Remember, desserts like this are best enjoyed in moderation, allowing you to appreciate the flavors and textures fully.
Conclusion
Making a rustic blackberry galette is a delightful culinary experience that combines the joy of baking with the pleasure of enjoying a homemade dessert. The flaky crust, sweet and tangy filling, and rustic presentation come together to create a dish that is both comforting and visually appealing.
Don’t hesitate to experiment with different fruits and variations; the beauty of a galette lies in its versatility. Whether you’re sharing it with family or friends, the warmth of a homemade dessert is sure to create lasting memories. So gather your ingredients, embrace the process, and enjoy the wonderful experience of baking and sharing your rustic blackberry galette delight.
