

In the world of baking, few treats can rival the delightful combination of cinnamon rolls and the indulgent taste of Oreo cookies. The Oreo Cookies and Cream Cinnamon Rolls offer a unique twist to the classic cinnamon roll, transforming it into a dessert that is both comforting and luxurious. Imagine biting into a soft, fluffy roll infused with the rich flavors of crushed Oreo cookies and warm cinnamon, topped with a creamy frosting—it’s a blend of nostalgia and decadence that is hard to resist.
These cinnamon rolls are not just a treat; they are an experience. Whether you’re hosting a brunch, celebrating a special event, or simply treating yourself after a long week, these rolls are sure to impress. The process of making them is as enjoyable as the final product, allowing you to engage with each step of the baking journey. With this article, you will find a detailed, step-by-step guide to create these mouth-watering rolls, ensuring a delicious outcome for any occasion.
Understanding the Ingredients
Before diving into the preparation, it’s crucial to understand the role of each ingredient in creating these delectable Oreo Cookies and Cream Cinnamon Rolls. Each component plays a vital part in achieving the perfect texture and flavor profile.
Exploring the Dough Components
1. All-Purpose Flour: This is the backbone of the dough, providing the necessary structure and strength. All-purpose flour has the right amount of protein to create gluten, which gives the rolls their chewy texture. When measuring flour, be sure to spoon it into the measuring cup and level it off for accuracy.
2. Granulated Sugar: Sugar plays a dual role in this recipe. Not only does it add sweetness, but it also contributes to the browning of the dough during baking. The caramelization of sugar enhances the flavor and gives the rolls a beautiful golden hue.
3. Instant Yeast: This type of yeast is preferred because it doesn’t require proofing, allowing for a quicker rise. Instant yeast works by fermenting the sugars in the dough, producing carbon dioxide that causes the dough to rise. It’s essential to store yeast properly in a cool, dry place to maintain its potency.
4. Salt: While it may seem like a simple ingredient, salt is crucial for enhancing flavors. It balances the sweetness of the sugar and strengthens the gluten structure, contributing to the overall texture of the rolls.
5. Warm Milk: Milk activates the yeast and helps to create a soft dough. The warmth of the milk is essential—too hot, and it can kill the yeast; too cold, and it won’t activate properly. Aim for a temperature around 110°F (43°C) for optimal results.
6. Eggs: Eggs add moisture and richness to the dough. They also act as an emulsifier, helping to combine the fat and liquid ingredients smoothly. Using room temperature eggs will help them incorporate more easily into the dough.
7. Unsalted Butter: Butter adds flavor and richness while also contributing to the tenderness of the rolls. Using unsalted butter allows you to control the salt content in the recipe better.
Delving into the Filling
The filling is where the magic happens, adding layers of flavor that make these cinnamon rolls truly special.
1. Brown Sugar and Cinnamon: A classic combination, the brown sugar provides a deep, caramel-like sweetness and moisture, while cinnamon adds warmth and spice. Together, they create the quintessential flavor profile of cinnamon rolls.
2. Softened Butter: The role of softened butter in the filling is to create a rich, spreadable mixture that binds the sugars and cinnamon together. This buttery filling oozes into the rolls as they bake, ensuring that each bite is packed with flavor.
3. Crushed Oreo Cookies: The star ingredient of this recipe, crushed Oreos add a unique flavor and texture. Their chocolatey crunch and creamy filling complement the cinnamon perfectly, making each roll a delightful surprise.
Crafting the Cream Cheese Frosting
No cinnamon roll is complete without a generous drizzle of frosting, and cream cheese frosting is the ideal choice for this recipe.
1. Cream Cheese: The base of the frosting, cream cheese provides a tangy flavor that balances the sweetness of the rolls. It also gives the frosting a rich, creamy texture that pairs perfectly with the cinnamon rolls.
2. Butter: Adding butter to the frosting helps achieve a smooth and creamy consistency. It also enhances the richness of the frosting, making it a decadent topping for the rolls.
3. Vanilla Extract: A splash of vanilla extract elevates the flavor profile of the frosting, adding depth and enhancing the overall sweetness.
4. Powdered Sugar and Milk: These ingredients are used to achieve the desired frosting consistency. Adjusting the amount of powdered sugar and milk allows you to create a frosting that is thick enough to hold its shape but smooth enough to drizzle.
Step-by-Step Preparation
Now that we’ve covered the ingredients, let’s move on to the preparation of the dough, which is the first crucial step in this baking endeavor.
Preparing the Dough
1. Combine the Dry Ingredients: In a large mixing bowl, combine the all-purpose flour, granulated sugar, instant yeast, and salt. Mix these dry ingredients thoroughly to ensure that the yeast is evenly distributed.
2. Mix the Wet Ingredients: In a separate bowl, whisk together the warm milk, eggs, and melted unsalted butter until well combined. The warmth of the milk should be comfortable to the touch—this is critical for activating the yeast.
3. Combine Wet and Dry Ingredients: Gradually pour the wet mixture into the dry ingredients, stirring gently with a wooden spoon or spatula until a shaggy dough begins to form. The dough should come together without being too sticky.
4. Knead the Dough: Transfer the dough onto a lightly floured surface. Knead the dough for about 8-10 minutes until it becomes smooth and elastic. Proper kneading is essential for gluten development, which will give the rolls their structure and chewiness.
5. First Rise: Once kneaded, place the dough in a lightly greased bowl, cover it with a clean kitchen towel or plastic wrap, and let it rise in a warm, draft-free environment. This should take about 1 to 2 hours, or until the dough has doubled in size.
Allowing the Dough to Rise
The rising process is vital for developing the dough’s texture and flavor. Here are some tips to create the ideal environment for your dough to rise:
– Warm Environment: Choose a warm spot in your kitchen, such as near a preheated oven (turned off) or atop a heat mat. The ideal temperature for dough rising is between 75°F and 85°F (24°C to 29°C).
– Cover the Dough: Keeping the dough covered prevents it from drying out and forming a crust, which can hinder the rising process. A damp towel or plastic wrap works well for this.
– Patience is Key: Allowing the dough to rise until it has doubled in size is critical. Rushing this step can result in dense rolls that lack the desired lightness and fluffiness.
With the dough rising, you are one step closer to creating these irresistible Oreo Cookies and Cream Cinnamon Rolls. In the next section, we will delve into the filling and frosting, ensuring that each component is perfectly crafted for a delightful final product. Stay tuned as we continue this delicious journey!
Understanding How and Why the Dough Rises
The magic of baking, particularly when it comes to cinnamon rolls, lies in the dough’s ability to rise. This process is primarily driven by yeast, which ferments the sugars in the dough, releasing carbon dioxide and ethanol. As the carbon dioxide gas expands, it creates bubbles within the dough, resulting in a light and fluffy texture.
When making Oreo Cookies and Cream Cinnamon Rolls, it’s important to allow the dough to rise properly. This not only enhances the flavor but also contributes to the pillowy softness that makes these rolls so irresistible. The first rise, or bulk fermentation, allows the dough to double in size, while the second rise, occurring after you shape the rolls, ensures they become tender and airy.
Creating the Filling
The filling is where you can truly bring the flavors of cookies and cream to life. Here’s how to create an evenly distributed filling that complements your cinnamon rolls beautifully:
1. Prepare the Ingredients: Gather your filling ingredients, which typically include brown sugar, ground cinnamon, and crushed Oreos. The crushed Oreos will provide that signature cookies and cream flavor.
2. Even Distribution Techniques: As you prepare your filling, ensure that the brown sugar and cinnamon are thoroughly mixed. This prevents clumps and ensures that every bite is flavorful. To incorporate the crushed Oreos, sprinkle them evenly over the cinnamon-sugar mixture before spreading it onto the dough. Use a spatula to gently press the mixture into the dough, ensuring it adheres well.
3. Rolling the Dough: Roll the dough into a precise rectangle measuring approximately 12×18 inches. This shape is crucial for even filling distribution, as it allows for uniform rolling and cutting. A rectangle that is too narrow may lead to unevenly filled rolls.
Rolling and Cutting Techniques
Proper rolling and cutting techniques are essential for creating beautiful cinnamon rolls:
1. Rolling the Dough: As you roll the dough, start from one long edge and gently roll it towards the opposite edge. Apply even pressure and maintain a consistent thickness throughout. If you encounter resistance, let the dough rest for a few minutes, allowing the gluten to relax. This will prevent tearing and ensure a smooth roll.
2. Cutting the Rolls: To cut the rolls cleanly, use a sharp knife or dental floss. If using a knife, apply a gentle sawing motion rather than pressing down too hard, which can squish the rolls. If using dental floss, slide it under the rolled dough, cross the ends over the top, and pull tight to create a clean cut. Aim for uniform slices, about 1 to 1.5 inches thick, to ensure even baking.
The Second Rise: Perfecting the Rolls
The second rise is crucial for achieving the perfect texture in your cinnamon rolls:
1. Significance of the Second Rise: After cutting your rolls, place them in a greased baking dish, leaving some space between each roll. This second rise allows the rolls to puff up, creating that desired soft and airy texture.
2. Proper Spacing: When placing the rolls in the baking dish, ensure they are spaced about 1 to 2 inches apart. This spacing allows for expansion during baking while maintaining that delightful roll shape. Cover the dish with a clean kitchen towel or plastic wrap, and let the rolls rise in a warm, draft-free area for about 30 to 45 minutes, or until they have doubled in size.
Baking the Rolls
Baking your Oreo Cookies and Cream Cinnamon Rolls is the final step to transforming your dough into a delicious treat:
1. Preheating and Oven Settings: Preheat your oven to 375°F (190°C) to ensure a hot and even baking environment. A properly preheated oven is key to achieving that golden-brown exterior while keeping the insides wonderfully soft.
2. Visual Cues for Perfect Baking: Bake the rolls for about 25 to 30 minutes, or until they are golden brown on top. The rolls should feel soft to the touch and spring back slightly when pressed. A toothpick inserted into the center should come out clean or with just a few moist crumbs attached, indicating they are fully baked.
Crafting the Frosting
No cinnamon roll is complete without a delicious frosting, and for these Oreo Cookies and Cream Cinnamon Rolls, a cream cheese frosting is a perfect match:
1. Step-by-Step Guide: In a mixing bowl, combine 8 ounces of softened cream cheese with 1/4 cup of unsalted butter. Beat them together until smooth and creamy. Gradually add 2 cups of powdered sugar and 1 teaspoon of vanilla extract, mixing until fully incorporated. If the frosting is too thick, you can add a splash of milk to reach your desired consistency.
2. Flavor Adjustments and Customization: To enhance the flavor of your frosting, consider adding crushed Oreos or a pinch of sea salt for a delightful contrast. You can also experiment with different extracts, like almond or peppermint, to create unique variations of this classic frosting.
Final Touches and Serving Suggestions
With your rolls baked and frosted, you’re almost ready to serve these delightful treats:
1. Frosting the Rolls: To achieve maximum coverage when applying the frosting, wait until the rolls are slightly warm. This allows the frosting to melt into the crevices, making each bite rich and flavorful. Use an offset spatula to spread the frosting evenly over the top, ensuring every roll gets a generous amount.
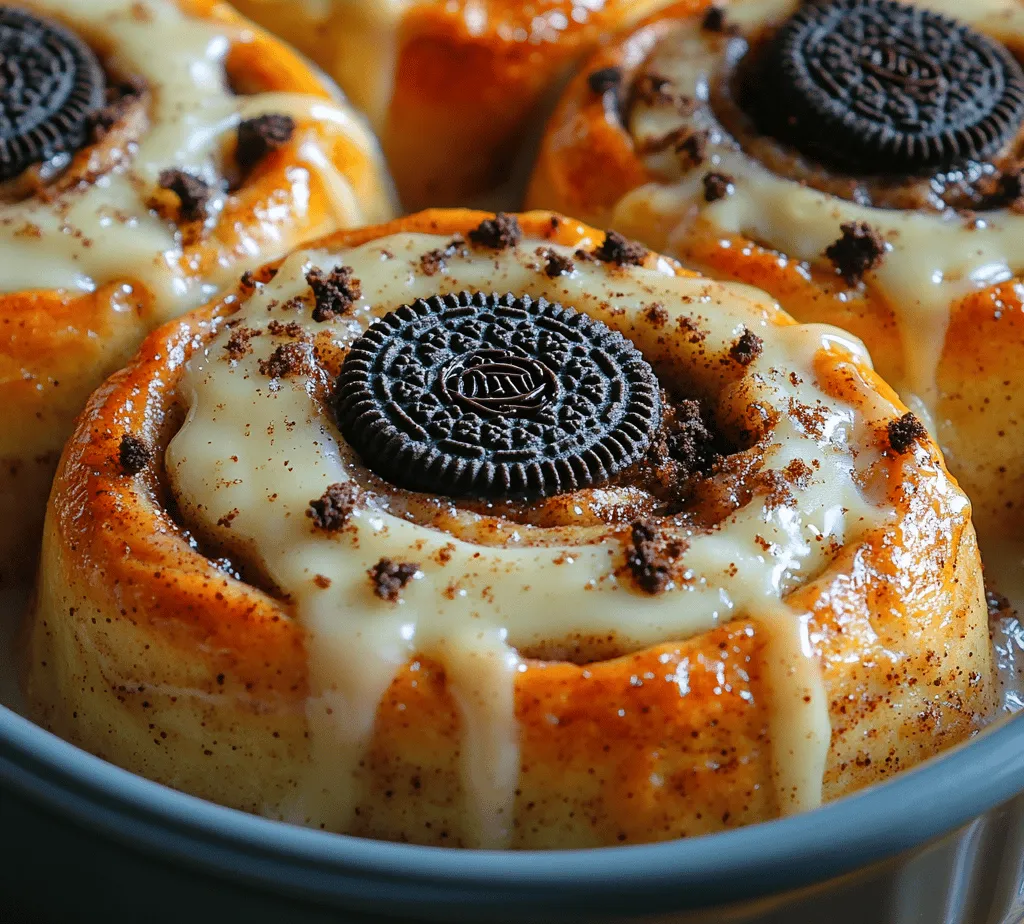
2. Optional Toppings: For an extra special touch, consider sprinkling crushed Oreos on top of the frosting. This not only enhances the presentation but also adds a delightful crunch that complements the soft rolls.
3. Serving Temperature and Presentation: Serve the rolls warm for the best experience. You can arrange them on a decorative platter, garnished with a few whole Oreos or a dusting of powdered sugar for an elegant touch.
4. Pairing Suggestions: These cinnamon rolls pair wonderfully with a variety of beverages. Consider serving them alongside a hot cup of coffee, a glass of cold milk, or a creamy vanilla latte. They also make a great addition to brunch tables alongside fresh fruit or yogurt.
Conclusion
The Oreo Cookies and Cream Cinnamon Rolls are a delightful fusion of flavors that encapsulate both nostalgia and indulgence. By following the detailed steps outlined in this article, you can create a batch of these scrumptious rolls that will surely be a hit with family and friends. Their gooey texture, combined with the rich cream cheese frosting and crunchy Oreo bits, creates a truly unforgettable treat. Enjoy these rolls warm, and let each bite transport you to dessert heaven. Whether for a special occasion or a cozy weekend breakfast, these cinnamon rolls will undoubtedly become a cherished favorite in your recipe collection.
