Mini Chicken Taco Biscuit Melts: A Delicious and Family-Friendly Recipe
When it comes to quick and satisfying meals, few dishes can compete with Mini Chicken Taco Biscuit Melts. This delightful recipe combines the comforting texture of flaky biscuits with the bold flavors of taco-inspired fillings, making it an instant favorite for both kids and adults alike. Whether you’re hosting a casual get-together, preparing a weeknight dinner, or simply looking for a fun snack, these mini melts are an ideal choice. Their bite-sized nature makes them perfect for sharing, while their rich flavors ensure that everyone will be coming back for seconds.
One of the standout features of Mini Chicken Taco Biscuit Melts is how easy they are to prepare. With minimal prep time and simple steps, even novice cooks can whip up this dish in no time. This makes it an excellent option for busy families looking to put a delicious meal on the table without the stress often associated with cooking. Plus, the recipe is versatile enough to accommodate various preferences—feel free to add your favorite toppings or swap in different proteins to suit your taste.
Understanding the Ingredients
To create the perfect Mini Chicken Taco Biscuit Melts, understanding the key ingredients and their roles in the recipe is essential. Each component contributes unique flavors and textures, resulting in a dish that is both satisfying and delicious.
– Refrigerated Biscuit Dough: The foundation of this recipe is refrigerated biscuit dough, which brings a convenient and flaky texture to the melts. This pre-made option saves time and effort, allowing you to focus on the flavorful filling without the hassle of making dough from scratch.
– Ground Chicken: As a lean protein option, ground chicken not only provides a hearty base for the taco filling but also absorbs the flavors of the seasonings beautifully. Its mild taste makes it a versatile ingredient that pairs well with various spices and toppings.
– Taco Seasoning: This essential ingredient serves as the flavor enhancer for the dish. A blend of spices typically found in taco seasoning—such as chili powder, cumin, and garlic powder—adds depth and richness to the ground chicken, giving it that signature taco flavor.
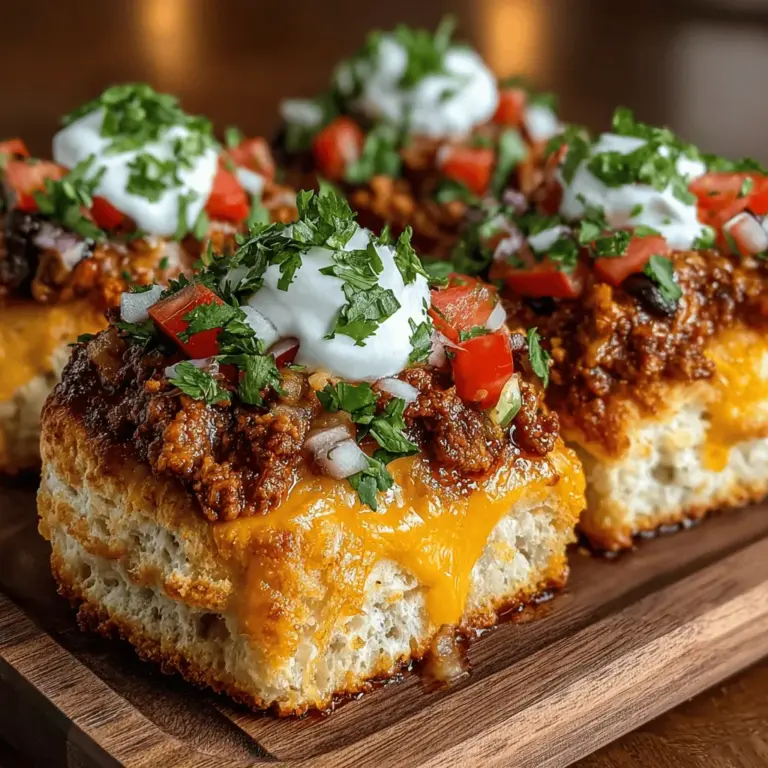
– Cheddar Cheese: No taco-inspired dish would be complete without cheese, and sharp cheddar is the perfect choice for these melts. It adds creaminess and a delightful melt factor, ensuring that each bite is rich and satisfying.
– Diced Tomatoes and Red Onion: For freshness and crunch, diced tomatoes and red onion provide a welcome contrast to the savory filling. The tomatoes add juiciness, while the red onion contributes a subtle sharpness that balances the richness of the cheese and chicken.
– Black Olives: Although optional, black olives can enhance the flavor profile of the dish. Their briny taste adds an extra layer of complexity, making each melt even more enjoyable. They also offer a nice visual contrast when sprinkled on top.
– Sour Cream: Often served as a creamy accompaniment, sour cream provides a cool and tangy contrast to the warm and savory melts. It’s an excellent way to elevate the dish and add a touch of indulgence.
– Fresh Cilantro: Finally, fresh cilantro serves as a vibrant garnish that adds a pop of color and a burst of fresh flavor. Its unique taste complements the other ingredients beautifully, making it a must-have for taco lovers.
Preparation Steps in Detail
Now that we have a solid understanding of the ingredients, it’s time to delve into the preparation steps involved in making Mini Chicken Taco Biscuit Melts. These initial steps set the stage for a successful cooking experience, ensuring that your melts turn out perfectly every time.
Preheating the Oven
Before you start cooking, it’s crucial to preheat your oven. Preheating ensures that the temperature is just right for baking, allowing the biscuits to rise properly and achieve that golden-brown color. Set your oven to the temperature specified in the recipe—typically around 350°F (175°C)—and give it enough time to reach the desired heat before placing your melts inside. This step is vital for achieving the perfect texture and consistency in your dish.
Cooking the Chicken
Once the oven is preheated, it’s time to cook the ground chicken. Start by heating a skillet over medium heat and adding a small amount of oil to prevent sticking. When the oil is hot, add the ground chicken to the skillet. Break it up with a spatula as it cooks, ensuring even browning.
As the chicken begins to brown, sprinkle in the taco seasoning. This is where the magic happens—mixing the seasoning with the chicken allows the flavors to meld beautifully. Continue cooking until the chicken is fully cooked through and no longer pink, which typically takes about 5-7 minutes. Be sure to stir occasionally to prevent any sticking and to allow for even cooking.
The aroma of the seasoned chicken will fill your kitchen, setting the stage for the delicious melts to come. Once the chicken is cooked, remove it from the heat and allow it to cool slightly while you prepare the other components of the recipe.
With these foundational steps completed, you’re well on your way to creating a dish that will delight your family and friends. The combination of flavorful ingredients, ease of preparation, and adaptability for various occasions makes Mini Chicken Taco Biscuit Melts a must-try recipe. Stay tuned to learn more about the assembly process and baking methods that will elevate your cooking game and impress your guests!

Preparing the Biscuits: Tips for Flattening Dough Evenly
The first step in creating your Mini Chicken Taco Biscuit Melts is preparing the biscuits. Using refrigerated biscuit dough is a convenient option that allows for quick assembly, but achieving the perfect thickness is crucial for the best results. Here are some tips for flattening the dough evenly:
1. Room Temperature Dough: Allow the biscuit dough to sit at room temperature for about 10-15 minutes before flattening. This makes it easier to work with and less likely to tear.
2. Flour Your Surface: Lightly dust your work surface with flour to prevent the dough from sticking. This also aids in achieving a smooth surface when rolling out the dough.
3. Use a Rolling Pin: Gently roll the dough out using a rolling pin. Start from the center and work your way outwards to maintain an even thickness. Aim for about 1/4-inch thickness for a perfect melt.
4. Uniform Shape: If you’re cutting the dough into rounds, use a biscuit cutter or a glass to ensure uniform shapes. This will help them cook evenly and hold their filling.
5. Avoid Overworking: Be careful not to overwork the dough, as this can lead to tough biscuits. Handle it just enough to flatten it out and keep it light and fluffy.
Assembling the Melts: Step-by-Step Guide to Filling and Sealing
Once your biscuits are prepared, it’s time to assemble your melts. Follow these straightforward steps to ensure each melt is filled and sealed perfectly:
1. Preheat Your Oven: Start by preheating your oven to 375°F (190°C). This ensures that your melts bake evenly and achieve that golden-brown finish.
2. Layer the Filling: Take your flattened biscuit and place it on a parchment-lined baking sheet. Spoon about 2 tablespoons of your chicken taco filling onto the center of each biscuit. Be cautious not to overfill, as this can lead to messy melts.
3. Seal the Melts: Gently fold the biscuit over the filling, creating a half-moon shape. Pinch the edges together firmly to seal the filling inside. For an extra secure seal, you can use a fork to crimp the edges.
4. Repeat: Continue this process with the remaining biscuits and filling until all are assembled.
5. Brush with Egg Wash: For a golden shine, whisk an egg and brush it over the tops of each melt. This will create a beautiful finish once baked.
Baking the Melts: Knowing When They’re Done
Baking your Mini Chicken Taco Biscuit Melts is the final step before indulging in this delectable dish. Here are some signs to look for to know when they are perfectly baked:
– Golden Brown Color: The tops of the melts should be a nice golden brown. Keep an eye on them during the last few minutes of baking to prevent any burning.
– Biscuit Firmness: Gently press the top of a melt; it should feel firm to the touch. If it feels soft and doughy, it likely needs more time in the oven.
– Filling Temperature: The filling should be hot and bubbly. If you’re unsure, you can use a meat thermometer to check that the internal temperature reaches 165°F (74°C) for chicken.
Once baked, remove the melts from the oven and allow them to cool for a few minutes before serving.
The Perfect Serving Suggestions
Your Mini Chicken Taco Biscuit Melts are not just delicious on their own; they can be elevated with the right garnishes and side dishes. Here are some serving suggestions to enhance your meal:
Ideas for Garnishing
– Fresh Cilantro: Sprinkle chopped fresh cilantro over the tops of the melts for a burst of color and added flavor. It complements the taco seasoning beautifully.
– Sour Cream: Serve with a dollop of sour cream on the side. This adds a creamy texture that balances the spices in the filling.
– Sliced Jalapeños: For those who enjoy a bit of heat, thinly sliced jalapeños can be a great addition.
Pairing Suggestions
– Salads: A light, fresh salad with ingredients like mixed greens, cherry tomatoes, and a lime vinaigrette pairs perfectly with the rich flavors of the melts.
– Salsas: Offer a variety of salsas, such as pico de gallo or corn salsa, to add another layer of flavor.
Presentation Tips for Serving at Gatherings
– Platter Display: Arrange the melts on a large platter, garnished with cilantro and lime wedges for an attractive presentation.
– Individual Servings: Consider serving them in individual portions, perhaps with small dipping bowls for salsa or sour cream. This adds a fun, casual touch to your gathering.
Nutritional Information
Understanding the nutritional profile of your Mini Chicken Taco Biscuit Melts can help you make informed choices. Here’s a brief overview:
Overview of Nutritional Benefits
– Protein Power: Chicken is a great source of lean protein, essential for muscle repair and growth.
– Healthy Fats: If you opt for cheese or avocados as toppings, they add healthy fats that can enhance heart health.
Caloric Breakdown
On average, each Mini Chicken Taco Biscuit Melt contains approximately 200-250 calories, depending on the specific ingredients and portion sizes used. Here’s a rough breakdown:
– Calories: 200-250 per melt
– Protein: 10-12 grams
– Fat: 8-10 grams
– Carbohydrates: 20-25 grams
Modifying the Recipe for Dietary Preferences
For those with dietary restrictions, this recipe can be easily adapted:
– Vegetarian Options: Substitute the chicken with black beans, lentils, or a meat alternative to create a vegetarian version.
– Dairy-Free: Use dairy-free cheese or skip the cheese altogether to make it dairy-free.
– Gluten-Free: Opt for gluten-free biscuit dough or make your own using gluten-free flour.
Versatility of Mini Chicken Taco Biscuit Melts
One of the best aspects of Mini Chicken Taco Biscuit Melts is their versatility. Here are some ways to customize the recipe to suit your taste:
Variations on the Recipe
– Different Proteins: Experiment with ground turkey, beef, or even shredded pork for different flavor profiles.
– Vegetarian Alternatives: Besides beans, consider adding sautéed veggies or tofu for a filling option.
Different Cheeses or Spices
– Cheese Choices: Use cheddar, pepper jack, or even a blend of cheeses for a unique twist on flavor.
– Spices for a Kick: Add cayenne pepper, smoked paprika, or taco seasoning to the filling to give it an extra punch.
Make-Ahead and Freezing Options
These melts can be made ahead of time, making them perfect for busy schedules:
– Freezing: Assemble the melts but do not bake them. Instead, freeze them in a single layer on a baking sheet, then transfer them to a freezer-safe bag. When ready to cook, bake from frozen, adding a few extra minutes to the cooking time.
– Refrigeration: You can also refrigerate them for a day or two before baking. Just keep them well-covered to prevent drying out.
Conclusion
Mini Chicken Taco Biscuit Melts are not only a fun and delicious meal option, but they also offer incredible versatility for various taste preferences. Whether you serve them as a delightful family dinner or a party appetizer, they are sure to impress. The combination of flaky biscuits and savory chicken filling creates a comfort food experience that’s hard to resist.
Don’t hesitate to experiment with different ingredients and garnishes to make this recipe your own. Homemade comfort food is not just rewarding to create but also satisfying to share. So gather your loved ones, whip up a batch of these delicious melts, and enjoy a delightful culinary adventure together!
