Creamy Dreamy Philadelphia Cheesecake Bars: A Delightful Dessert Experience

WANT TO SAVE THIS RECIPE?

Introduction

There’s something truly special about homemade desserts—a unique blend of love, creativity, and the tantalizing aromas that fill the kitchen as they bake. Whether it’s a family gathering, a special occasion, or a simple weeknight treat, desserts have a way of bringing joy and warmth to our lives. Among the many delightful options available, cheesecakes hold a special place in the hearts of dessert lovers. Today, we’re excited to introduce you to the Creamy Dreamy Philadelphia Cheesecake Bars, a delectable treat that perfectly captures the essence of traditional cheesecake but with the added convenience of being easily served in bar form.

Cheesecake bars are celebrated for their creamy texture and rich flavor, making them a crowd favorite. Unlike traditional cheesecakes that require meticulous slicing and serving, these bars offer a more straightforward approach—ideal for parties, potlucks, or simply indulging at home. The best part? Their versatility! You can customize them with various toppings and flavors, making each batch unique.

This particular recipe shines with the use of Philadelphia cream cheese, a brand synonymous with quality and a rich, velvety texture that elevates any cheesecake. The simplicity of the recipe allows even novice bakers to create a dessert that feels luxurious without spending hours in the kitchen. So, let’s dive into the delightful world of Creamy Dreamy Philadelphia Cheesecake Bars and explore how to make them from scratch.

Understanding the Ingredients

To create the perfect bars, it’s essential to understand the key ingredients that contribute to their exceptional flavor and texture. Each component plays a significant role in crafting a dessert that will leave everyone asking for seconds.

Key Ingredients Overview

Graham Cracker Crumbs: The foundation of our cheesecake bars begins with a buttery graham cracker crust. These crumbs provide a sweet, crunchy base that perfectly complements the creamy filling. Not only do they add texture, but they also offer a delightful contrast to the smoothness of the cheesecake.

Unsalted Butter: Butter is crucial in creating a rich flavor for the crust. By using unsalted butter, we have better control over the overall saltiness of the dessert. When melted and mixed with the graham cracker crumbs, it binds the crust together, ensuring it holds its shape when cut into bars.

Granulated Sugar: Sweetness is key in any dessert, and granulated sugar plays a vital role in both the crust and the filling. It balances the flavors and enhances the overall taste of the cheesecake bars. The sugar helps to create a slight crunch in the crust while adding that sweet creaminess to the filling.

Philadelphia Cream Cheese: The star ingredient of this recipe is undoubtedly Philadelphia cream cheese. Known for its smooth consistency and rich flavor, it is essential for achieving that classic cheesecake taste. Its creamy texture makes the filling luscious and indulgent, creating the perfect balance with the crust.

Optional Ingredients for Enhanced Flavor

While the core ingredients are essential, there are some optional additions that can take your cheesecake bars to the next level:

Lemon Zest: Adding a touch of lemon zest brings brightness and a hint of acidity, which cuts through the richness of the cheesecake. It adds a refreshing twist that can elevate the flavor profile and make every bite more enjoyable.
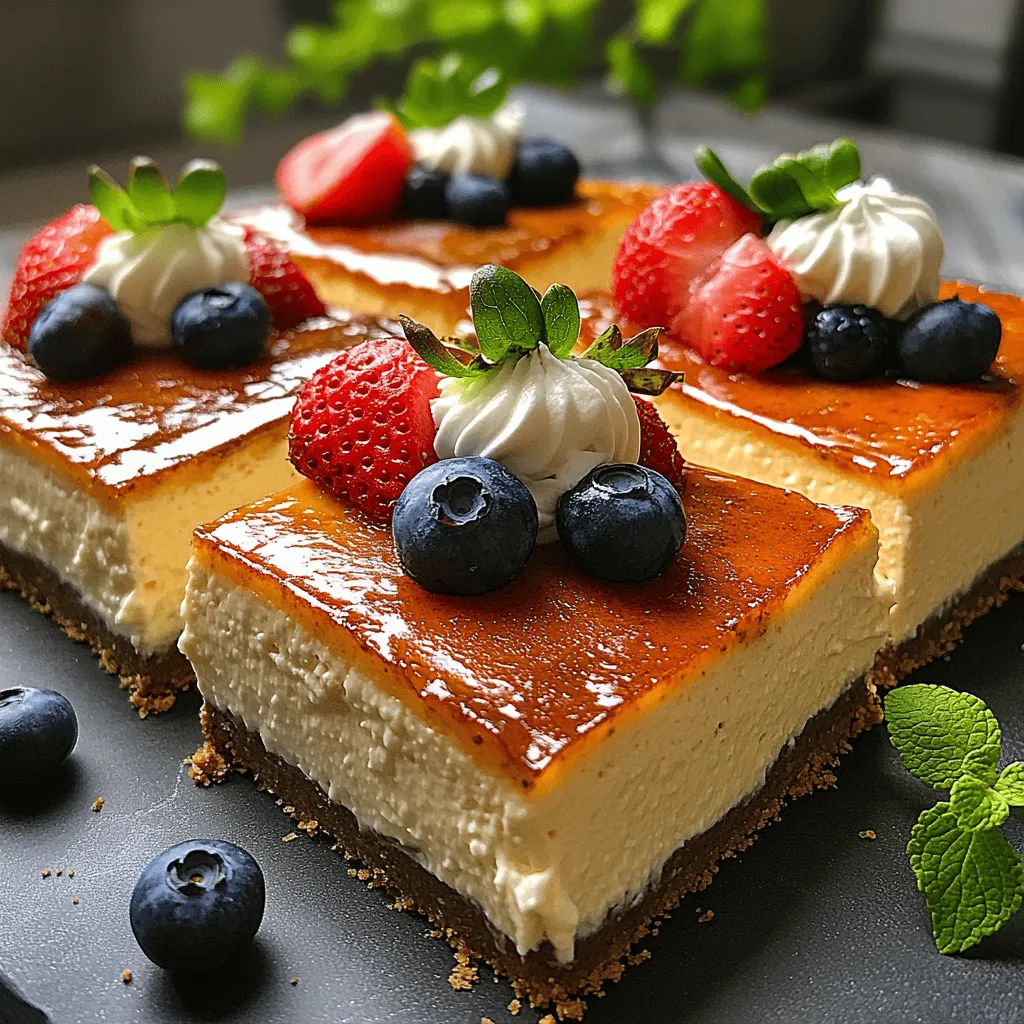
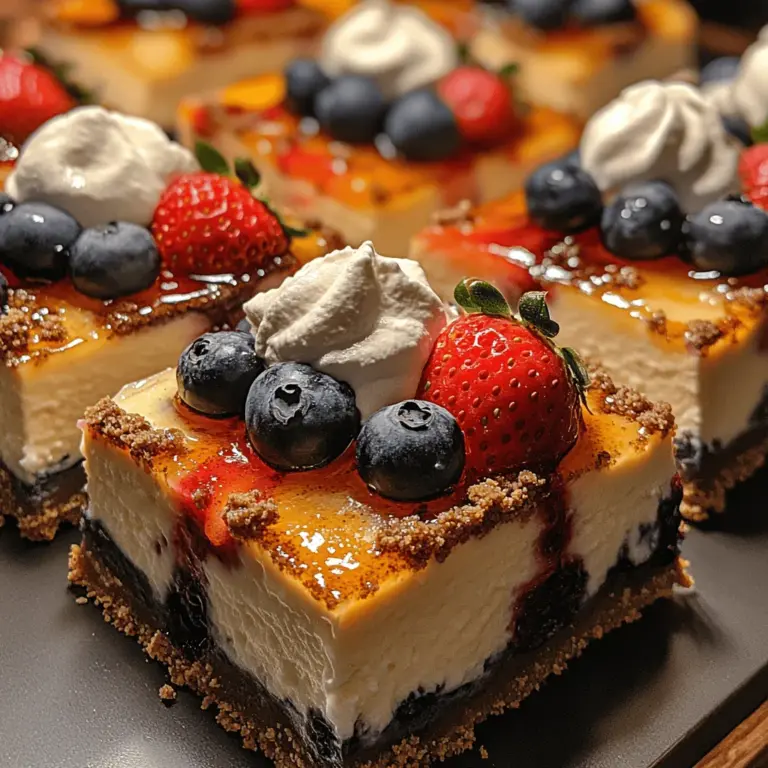
Fresh Berries and Whipped Cream: Toppings can transform your cheesecake bars from delicious to extraordinary. Fresh berries, such as strawberries, blueberries, or raspberries, not only enhance the visual appeal but also provide a burst of freshness. A dollop of whipped cream on top adds a light and airy finish, making the bars even more indulgent.

Creating the Perfect Crust

The crust is a crucial component of any cheesecake, and creating the perfect one requires attention to detail. Here’s how to make a graham cracker crust that will serve as a delightful base for your Creamy Dreamy Philadelphia Cheesecake Bars.

Step-by-Step Crust-Making Process

1. Gather Your Ingredients: For the crust, you will need graham cracker crumbs, unsalted butter, granulated sugar, vanilla extract, and a pinch of salt.

2. Mix the Dry Ingredients: In a mixing bowl, combine the graham cracker crumbs and granulated sugar. The sugar adds sweetness to the crust, while the crumbs provide the structure.

3. Melt the Butter: In a microwave-safe bowl or on the stovetop, melt the unsalted butter until it’s completely liquid. Allow it to cool slightly before adding it to the dry ingredients.

4. Combine Butter with Dry Mix: Pour the melted butter into the graham cracker mixture. Add in the vanilla extract and a pinch of salt. Stir until the mixture is well combined and resembles wet sand. The mixture should clump together when pressed.

Achieving the Right Texture

The texture of the crust is crucial for a successful cheesecake bar. You want it to be firm enough to hold its shape while still being tender and crumbly when you bite into it. Here are some tips to ensure you achieve the right consistency:

Press Firmly: When transferring the crust mixture into your baking dish, use the back of a measuring cup or your fingers to press it down firmly. This will help compact the mixture and create a solid foundation for your cheesecake filling.

Pre-Bake for Flavor: Pre-baking the crust for about 10 minutes at 350°F (175°C) enhances its flavor and helps to prevent it from becoming soggy once the filling is added. This step is essential for achieving that perfect balance of crunch and creaminess.

Baking the Crust to Perfection

Once you’ve pressed the crust into the baking dish, it’s time to bake it. Here’s the process:

1. Preheat the Oven: Make sure your oven is preheated to 350°F (175°C) before placing the crust inside.

2. Bake: Place the dish in the oven and bake for about 10 minutes or until the edges are lightly golden. Keep an eye on it to avoid over-baking, as you want the crust to be firm but not too dark.

3. Cooling: Once baked, remove the crust from the oven and let it cool while you prepare the cheesecake filling. This cooling time is essential, as it allows the crust to set properly before adding the creamy filling.

The crust not only provides structure but also balances the rich, creamy filling of the cheesecake. A well-made crust is the foundation of any successful cheesecake bar, so take your time with this step.

Crafting the Cheesecake Filling

With the crust ready, it’s time to focus on crafting the creamy cheesecake filling that will make these bars irresistible. The filling is where the magic happens, and with a few simple steps, you can create a luscious, velvety mixture that will be the star of your dessert.

Step-by-Step Breakdown of the Cheesecake Filling Preparation

1. Ingredients Preparation: Gather your ingredients for the filling, which include Philadelphia cream cheese, granulated sugar, eggs, vanilla extract, and any optional ingredients like lemon zest.

2. Soften the Cream Cheese: For the best results, ensure your cream cheese is softened to room temperature. This allows it to blend smoothly without lumps, resulting in a creamy filling. If you forget to take it out ahead of time, you can microwave it in short bursts (10-15 seconds) until softened but not melted.

3. Mix Cream Cheese and Sugar: In a large mixing bowl, beat the softened cream cheese with granulated sugar using an electric mixer. Mix on medium speed until the mixture is smooth and creamy, with no lumps remaining. This process should take about 2-3 minutes.

4. Add Eggs: Once the cream cheese and sugar are well combined, add in the eggs one at a time. Beat on low speed just until incorporated after each addition. Avoid over-mixing at this stage to prevent incorporating too much air, which can lead to cracks in the cheesecake.

5. Incorporate Vanilla and Optional Ingredients: Add the vanilla extract and any optional ingredients like lemon zest at this point. The vanilla enhances the flavor, while the lemon zest adds a refreshing brightness to the filling.

6. Mix Until Smooth: Continue to mix the filling until it’s fully combined and smooth. Scrape down the sides of the bowl as needed to ensure all ingredients are well incorporated.

7. Pour Over the Crust: Once your filling is ready, pour it gently over the cooled crust, spreading it evenly with a spatula. This helps to ensure a uniform layer of cheesecake filling across the bars.

By following these steps, you’ll create a creamy filling that’s rich in flavor and perfectly complements the graham cracker crust. The combination of the two will result in cheesecake bars that are not only delicious but also visually appealing.

As we continue to explore the process of making Creamy Dreamy Philadelphia Cheesecake Bars, we will delve deeper into the baking and cooling methods, as well as providing tips for serving and storage. Stay tuned for the rest of this delightful dessert journey!

There’s something truly special about homemade desserts—a unique blend of love, creativity, and the tantalizing aromas that fill the kitchen as they bake. Whether it's a family gathering, a special occasion, or a simple weeknight treat, desserts have a way of bringing joy and warmth to our lives. Among the many delightful options available, cheesecakes hold a special place in the hearts of dessert lovers. Today, we’re excited to introduce you to the <strong>Creamy Dreamy Philadelphia Cheesecake Bars</strong>, a delectable treat that perfectly captures the essence of traditional cheesecake but with the added convenience of being easily served in bar form.” /></p>
</p>
<h3>Importance of Softening Cream Cheese for a Smooth Texture</h3>
</p>
<p>To achieve the perfect creamy filling for your Philadelphia Cheesecake Bars, it’s essential to start with softened cream cheese. Cold cream cheese straight from the refrigerator can lead to lumps in your batter, resulting in a less-than-desirable texture. Softening the cream cheese allows it to blend seamlessly with the other ingredients, creating a velvety smooth mixture.</p>
</p>
<p>To soften cream cheese effectively, you can leave it at room temperature for about 30 minutes before you begin your recipe. If you’re short on time, you can quickly soften it in the microwave. Place the cream cheese on a microwave-safe plate and heat it in 10-second intervals until it’s soft but not melted. This step is crucial for achieving that signature creamy consistency.</p>
</p>
<h3>Gradually Mixing Sugar and Other Ingredients</h3>
</p>
<p>Once your cream cheese is softened, the next step is to incorporate your sugar and other ingredients. It’s important to mix the sugar gradually into the cream cheese. Start by adding a small amount at a time, which helps the sugar dissolve evenly and prevents any gritty texture in your filling. Use a hand mixer or stand mixer on a medium speed to combine the ingredients until smooth.</p>
</p>
<p>Incorporating other ingredients, such as vanilla extract, should follow the same gradual approach. This method ensures that all flavors meld beautifully together, enhancing the overall taste of your cheesecake bars.</p>
</p>
<h3>Incorporating Eggs and Avoiding Overbeating</h3>
</p>
<p>When it comes to adding eggs to your cheesecake mixture, moderation is key. Begin by adding one egg at a time, mixing gently until just combined. Overbeating at this stage can introduce excess air into the batter, leading to cracks as the cheesecake bakes. You want your filling to be smooth and creamy without incorporating too much air, so blend only until you see no visible egg streaks.</p>
</p>
<h3>Tips for Achieving the Perfect Consistency in the Filling</h3>
</p>
<p>To ensure your cheesecake filling has the perfect consistency, consider these tips:</p>
</p>
<p>1. <strong>Temperature Matters</strong>: All your ingredients, including eggs and sour cream, should be at room temperature. This helps them combine better, resulting in a smoother filling.</p>
</p>
<p>2. <strong>Use a Rubber Spatula</strong>: After mixing with an electric mixer, use a rubber spatula to give the filling a final stir. This technique allows you to scrape down the sides of the bowl, ensuring everything is well incorporated.</p>
</p>
<p>3. <strong>Avoid Overmixing</strong>: Once you add the eggs, mix just until combined. Overmixing can lead to a dense texture and cracks in your bars.</p>
</p>
<h3>The Impact of Sour Cream and Flour</h3>
</p>
<p>Sour cream and flour play significant roles in achieving both creaminess and structure in your cheesecake bars. The sour cream adds a delightful tang, balancing the sweetness, while also contributing to the overall moisture of the filling. It enhances the creaminess, making each bite rich and satisfying.</p>
</p>
<p>Flour, on the other hand, acts as a stabilizer. It gives the bars structure, preventing them from being too loose once baked. The combination of these two ingredients is vital in ensuring your cheesecake bars have the perfect texture, holding their shape while remaining deliciously creamy.</p>
</p>
<h3>Baking the Cheesecake Bars</h3>
</p>
<h4>Pouring and Spreading the Filling Over the Crust</h4>
</p>
<p>Once your filling is ready, it’s time to pour it over the crust. Carefully spoon the filling onto the pre-baked crust, ensuring an even distribution. Use an offset spatula to gently spread the filling across the crust. This step is important for achieving even baking and a consistent texture throughout the bars.</p>
</p>
<h4>Baking Tips for Achieving the Ideal Texture</h4>
</p>
<p>Baking your cheesecake bars requires attention to detail. Preheat your oven to 325°F (160°C) to ensure even cooking. Place the baking dish on the middle rack to promote uniform heat distribution.</p>
</p>
<p>To prevent cracking, consider using a water bath (bain-marie). Wrap the bottom of your baking dish in aluminum foil and place it in a larger pan filled with water. This method creates a humid environment, which helps maintain moisture in the cheesecake while it bakes.</p>
</p>
<h4>Recognizing the Signs of Doneness</h4>
</p>
<p>Knowing when your cheesecake bars are done baking is crucial. Look for set edges with a slight jiggle in the center. The center should not be completely firm; it will set as it cools. Overbaking can lead to dry bars, so keep a close eye on them during the last few minutes of baking.</p>
</p>
<h3>Importance of Cooling and Chilling for Texture and Flavor Development</h3>
</p>
<p>Once your cheesecake bars are baked, remove them from the oven and allow them to cool at room temperature for about an hour. After they’ve cooled, transfer them to the refrigerator. Chilling for at least four hours, or ideally overnight, allows the flavors to meld and the texture to firm up. This step is critical; a well-chilled cheesecake will slice cleanly and have a more defined flavor profile.</p>
</p>
<h3>Serving Suggestions</h3>
</p>
<h4>Creative Ideas for Presenting the Cheesecake Bars</h4>
</p>
<p>When it comes to serving your Creamy Dreamy Philadelphia Cheesecake Bars, presentation is everything. Cut them into squares or rectangles, and consider placing them on a decorative serving platter. You can dust the tops with powdered sugar or cocoa powder for a beautiful touch.</p>
</p>
<h4>Topping with Fresh Berries and Whipped Cream Variations</h4>
</p>
<p>Enhance the flavor and visual appeal of your cheesecake bars by adding fresh toppings. Berries such as strawberries, blueberries, or raspberries add a burst of color and freshness. You can also drizzle a homemade berry sauce or caramel sauce over the top for an extra layer of flavor.</p>
</p>
<p>Whipped cream is a classic accompaniment to cheesecake, providing a light and airy contrast to the dense filling. For a twist, consider flavored whipped creams, such as vanilla or citrus-infused.</p>
</p>
<h4>Serving Suggestions for Different Occasions</h4>
</p>
<p>These cheesecake bars are versatile and perfect for various occasions. Whether it’s a birthday party, family gathering, or holiday celebration, they make an excellent dessert choice. For an elegant touch at dinner parties, serve them alongside coffee or dessert wine.</p>
</p>
<h4>Discussing the Versatility of the Recipe</h4>
</p>
<p>One of the best aspects of this cheesecake bar recipe is its versatility. You can customize flavors by adding chocolate, caramel, or even citrus zest to the filling. Consider mixing in crushed cookies or candy bars for an added crunch. The possibilities are endless, allowing you to create a unique dessert for any palate.</p>
</p>
<h3>Nutritional Information</h3>
</p>
<h4>Overview of Nutritional Aspects of the Recipe</h4>
</p>
<p>While these cheesecake bars are undeniably delicious, they also contain essential nutrients. A typical serving provides a balanced mix of carbohydrates, fats, and proteins, making them a satisfying treat.</p>
</p>
<h4>Breakdown of Calories and Key Nutrients Per Serving</h4>
</p>
<p>On average, a serving of these cheesecake bars contains approximately 250-300 calories, depending on the specific ingredients used. Each bar offers a good source of calcium from the cream cheese and sour cream, along with some vitamins from any added fruit toppings.</p>
</p>
<h4>Discussing How to Make the Recipe Healthier</h4>
</p>
<p>If you’re looking to make the recipe a bit healthier, consider substituting some of the cream cheese with Greek yogurt for added protein and lower fat content. You can also reduce the sugar or use natural sweeteners like honey or maple syrup. Using a whole grain crust or a nut-based crust can increase dietary fiber as well.</p>
</p>
<h3>Conclusion</h3>
</p>
<p>The Creamy Dreamy Philadelphia Cheesecake Bars stand out not only for their rich, velvety texture but also for their incredible flavor. They are a testament to the joy of baking and sharing homemade desserts with loved ones. Each bite showcases the perfect balance of sweetness and tang, making them a delightful treat for any occasion.</p>
</p>
<p>So why not try making these cheesecake bars at home? With their simplicity and deliciousness, they will surely become a favorite among family and friends. Embrace the joy of baking and indulge in the creamy goodness of these cheesecake bars that are sure to impress!</p>
</div>

There’s something truly special about homemade desserts—a unique blend of love, creativity, and the tantalizing aromas that fill the kitchen as they bake. Whether it's a family gathering, a special occasion, or a simple weeknight treat, desserts have a way of bringing joy and warmth to our lives. Among the many delightful options available, cheesecakes hold a special place in the hearts of dessert lovers. Today, we’re excited to introduce you to the Creamy Dreamy Philadelphia Cheesecake Bars, a delectable treat that perfectly captures the essence of traditional cheesecake but with the added convenience of being easily served in bar form.

Philadelphia Cheesecake Bars

Indulge in the world of homemade desserts with these Creamy Dreamy Philadelphia Cheesecake Bars. This easy recipe combines a buttery graham cracker crust with a rich Philadelphia cream cheese filling, making it perfect for any occasion. Customize your bars with fresh berries or a drizzle of chocolate for an extra special touch. Experience the joy of baking as you create a treat that is both delightful and memorable for family and friends. Enjoy every creamy bite!

Ingredients
  

For the Crust:

1 ¾ cups graham cracker crumbs

½ cup unsalted butter, melted

⅓ cup granulated sugar

1 teaspoon vanilla extract

A pinch of salt

For the Cheesecake Filling:

24 oz (3 packages) Philadelphia cream cheese, softened

¾ cup granulated sugar

1 teaspoon vanilla extract

3 large eggs

1 cup sour cream

2 tablespoons all-purpose flour

Zest of 1 lemon (optional, for an extra zing)

For the Topping:

Fresh berries (strawberries, blueberries, or raspberries)

Whipped cream (optional)

--

Instructions
 

Preheat oven and prepare the pan: Preheat your oven to 325°F (160°C). Line a 9x13-inch baking pan with parchment paper, leaving some overhang for easy removal later.

    Make the crust: In a mixing bowl, combine the graham cracker crumbs, melted butter, granulated sugar, vanilla extract, and salt. Mix until the crumbs are evenly coated. Press the mixture firmly into the bottom of the prepared baking pan to create an even layer. Bake in preheated oven for 10 minutes. Remove and let cool slightly.

      Prepare cheesecake filling: In a large bowl, beat the softened Philadelphia cream cheese using an electric mixer until smooth and creamy (about 1-2 minutes). Gradually add in the granulated sugar, mixing until combined. Scrape down the sides of the bowl.

        Incorporate eggs and other ingredients: Add in the vanilla extract and lemon zest (if using), followed by the eggs one at a time, mixing just until combined. Be careful not to overbeat. Finally, add the sour cream and flour, and mix until the batter is smooth and creamy.

          Combine and bake: Pour the cheesecake filling over the cooled graham cracker crust. Smooth the top with a spatula. Bake in the preheated oven for 30-35 minutes, or until the edges are set, but the center still has a slight jiggle (it will firm up as it cools).

            Cool and chill: Once baked, remove the cheesecakes from the oven and allow them to cool in the pan at room temperature for an hour. After that, refrigerate for at least 3-4 hours, or overnight for best results.

              Serve: Once chilled and set, lift the cheesecake bars out of the pan using the parchment paper edges. Cut them into squares or rectangles as desired. Top with fresh berries and a dollop of whipped cream if you like, before serving.

                ---

                  Prep Time, Total Time, Servings: 20 minutes | 4 hours | 16 bars

                    WANT TO SAVE THIS RECIPE?

                    Leave a Comment

                    Recipe Rating