Sweet Dreams Bread Recipe: A Journey to Homemade Bliss

WANT TO SAVE THIS RECIPE?

Introduction

There’s something undeniably comforting about the aroma of freshly baked bread wafting through your home. The anticipation that builds as you await the warm, golden loaf is a sensory experience that transcends the act of cooking—it evokes nostalgia, warmth, and an undeniable sense of satisfaction. Enter Sweet Dreams Bread, a delightful recipe that combines simplicity with indulgence, creating a loaf that is as versatile as it is delicious. Whether you enjoy it plain, toasted, or adorned with your favorite spread, this bread is sure to become a cherished staple in your kitchen.

Sweet Dreams Bread is not just any ordinary loaf; it is a celebration of quality ingredients that come together to create a texture that is soft, tender, and lightly sweetened. The use of sweetened condensed milk adds a unique richness that sets this bread apart from traditional recipes, making it perfect for breakfast, snacks, or even dessert. In this article, we will explore the magic of this recipe, delving into the essential ingredients and the science behind bread making that will help you achieve a perfect loaf every time.

The Comfort of Homemade Bread

Baking bread at home is an experience that brings a sense of accomplishment and joy. Many home bakers can attest to the therapeutic nature of kneading dough and watching it rise as it transforms from simple ingredients into a beautiful, fragrant loaf. Homemade bread allows you to control the quality of ingredients, ensuring that you are nourishing your body with wholesome goodness. Additionally, there’s an emotional connection to the process; it brings family and friends together around the table, creating lasting memories over shared meals.

In the hustle and bustle of modern life, making bread from scratch offers a reprieve from the chaos. It’s a moment to slow down and engage with the process, relishing each step as you create something that nourishes not only the body but the soul. Sweet Dreams Bread, with its rich flavor and delightful texture, embodies this sentiment, inviting you to experience the joy of baking.

The Importance of Quality Ingredients

At the heart of every great recipe lies the quality of its ingredients. For Sweet Dreams Bread, each component plays a crucial role in achieving the desired flavor and texture. Choosing high-quality ingredients not only enhances the taste but also elevates the overall baking experience. Here’s a closer look at what you’ll need for this recipe and why each item is essential.

Understanding the Ingredients

All-Purpose Flour

All-purpose flour serves as the foundation of any bread recipe, providing the necessary structure and texture. It contains a balanced amount of protein, which is essential for gluten development. Gluten is what gives bread its chewiness and elasticity, allowing it to rise and hold its shape. When selecting flour, opt for unbleached all-purpose flour for a more natural taste and texture.

Sweetened Condensed Milk

Sweetened condensed milk is the star ingredient in Sweet Dreams Bread, imparting an irresistible sweetness and moisture that cannot be replicated with regular milk or sugar alone. This creamy ingredient not only enriches the flavor but also contributes to the bread’s soft texture, making each bite melt in your mouth. Its unique composition of sugar and milk helps in browning the crust, adding to the visual appeal.

Warm Water

Water is a crucial element in the bread-making process, as it activates the yeast and hydrates the flour. Using warm water (around 110°F or 43°C) is essential for optimal yeast activation. If the water is too hot, it can kill the yeast, while water that is too cold may not activate it effectively. The warmth encourages the yeast to flourish, leading to a better rise in your dough.

Granulated Sugar

Sugar plays a dual role in bread making. Not only does it sweeten the dough, but it also acts as food for the yeast, aiding in fermentation. When the yeast consumes the sugar, it produces carbon dioxide, which causes the dough to rise. In Sweet Dreams Bread, sugar enhances the overall flavor and contributes to the bread’s tender crumb.

Instant Yeast

Instant yeast is a time-saving ingredient that allows for quicker rises and less waiting time. Unlike active dry yeast, instant yeast can be mixed directly into the dry ingredients without prior activation. This convenience makes it a favored choice among home bakers, especially for recipes like Sweet Dreams Bread, where a fluffy texture is paramount.

Salt

Salt is often overlooked in baking, but it plays a vital role in enhancing flavor and controlling the fermentation process. It strengthens gluten structure, contributing to the dough’s elasticity and chewiness. Moreover, salt regulates yeast activity, preventing it from rising too quickly, which can lead to undesirable textures. A pinch of salt elevates the taste of Sweet Dreams Bread, making it more enjoyable.

Unsalted Butter

Unsalted butter adds richness and flavor to the bread, creating a tender crumb and a delightful mouthfeel. The fat in butter coats the flour proteins, inhibiting gluten development to some extent, which results in a softer loaf. Using unsalted butter allows you to better control the salt content in your recipe, ensuring a perfectly balanced flavor.

Large Egg

Eggs are essential in bread making as they provide moisture, richness, and structure. They act as a binding agent, helping to hold the ingredients together while also contributing to the bread’s rise. The proteins in the egg coagulate during baking, adding stability to the loaf. In Sweet Dreams Bread, the egg enhances the overall flavor and texture, making it a key component in achieving the perfect consistency.

Vanilla Extract

A splash of vanilla extract adds a subtle yet delightful flavor enhancement to Sweet Dreams Bread. It complements the sweetness of the condensed milk and sugar, elevating the overall taste profile. High-quality vanilla extract can transform an ordinary loaf into something truly special, making it a worthwhile addition to the ingredient list.

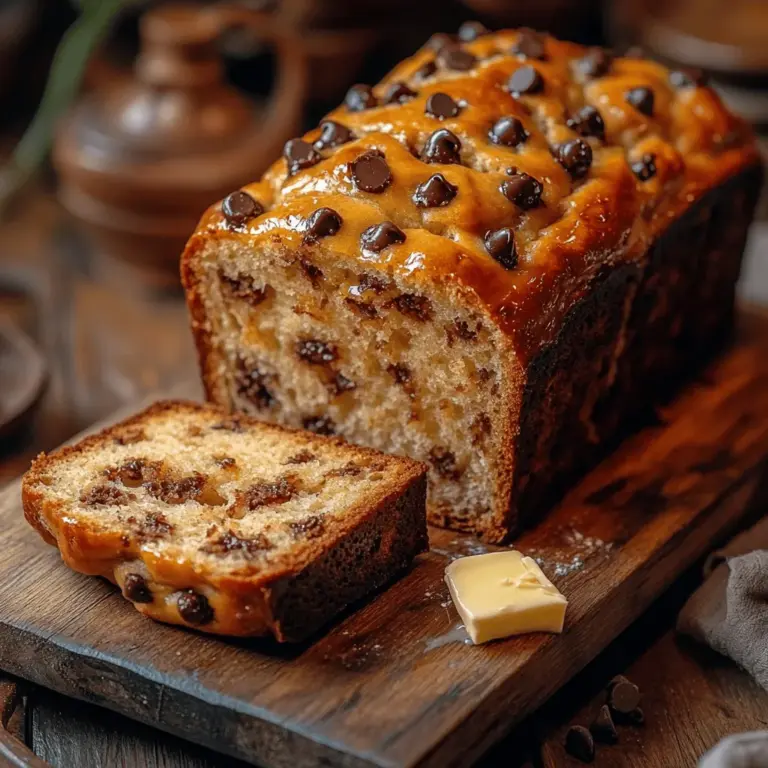
Chocolate Chips or Nuts (Optional)

To customize your Sweet Dreams Bread, consider adding chocolate chips or nuts. These optional ingredients not only enhance the flavor but also provide a delightful texture contrast. Chocolate chips melt into the warm bread, creating pockets of gooey sweetness, while nuts add a satisfying crunch. Feel free to experiment with different combinations to find your perfect version of this delicious loaf.

The Science Behind Bread Making

Understanding the science behind bread making can elevate your baking skills and help you troubleshoot any issues that may arise. The process involves several key steps, each of which contributes to the final product’s texture and flavor.

Activation of Yeast

The first step in bread making is activating the yeast, a crucial process that determines the rise of your dough. Yeast is a living organism that feeds on sugar, producing carbon dioxide gas and alcohol in the process. This gas gets trapped in the dough, causing it to expand and rise. When using instant yeast, you can mix it directly with the flour and sugar, allowing it to activate as the dough is kneaded and hydrated.

Gluten Development Through Kneading

Kneading is an essential step in bread making that develops gluten, the protein network responsible for the dough’s structure. As you knead the dough, the gluten strands stretch and align, creating a strong framework that can trap the gas produced by the yeast. This process is vital for achieving a chewy texture and a well-structured loaf. Kneading should be done until the dough is smooth and elastic, which usually takes about 8-10 minutes by hand or 5-7 minutes using a stand mixer.

Importance of Rising Times

Once the dough is kneaded, it needs to rise, allowing the yeast to work its magic. The first rise, known as fermentation, typically lasts between 1 to 2 hours, depending on the temperature and humidity of your environment. During this time, the dough will double in size as the yeast produces carbon dioxide. After the first rise, the dough is gently punched down to release excess gas before shaping and allowing it to rise again (the second rise). This second rise is crucial for developing flavor and a light, airy crumb structure.

Understanding these key elements of bread making will not only help you create a perfect loaf of Sweet Dreams Bread but also empower you to dive deeper into the world of baking, experimenting with flavors and techniques along the way. With this knowledge, you are well on your way to mastering the art of bread making. Stay tuned for the next part, where we will guide you through the detailed instructions to bring your Sweet Dreams Bread to life.

There's something undeniably comforting about the aroma of freshly baked bread wafting through your home. The anticipation that builds as you await the warm, golden loaf is a sensory experience that transcends the act of cooking—it evokes nostalgia, warmth, and an undeniable sense of satisfaction. Enter <strong>Sweet Dreams Bread</strong>, a delightful recipe that combines simplicity with indulgence, creating a loaf that is as versatile as it is delicious. Whether you enjoy it plain, toasted, or adorned with your favorite spread, this bread is sure to become a cherished staple in your kitchen.” /></p>
</p>
<h3>Step-by-Step Instructions for Sweet Dreams Bread</h3>
</p>
<h4>Activating the Yeast: How to Ensure Successful Fermentation</h4>
</p>
<p>To kick off your Sweet Dreams Bread, start by activating the yeast. This step is crucial as it ensures that the yeast is alive and ready to help your dough rise. In a small bowl, combine 1 packet (2 ¼ teaspoons) of active dry yeast with ¼ cup of warm water (about 110°F or 43°C) and a pinch of sugar. Stir gently and let it sit for about 5-10 minutes until it becomes frothy. This bubbly mixture indicates that the yeast is active—an essential foundation for your bread’s rise.</p>
</p>
<h4>Mixing the Wet Ingredients: Achieving a Smooth Mixture</h4>
</p>
<p>In a large mixing bowl, combine the activated yeast mixture with ½ cup of milk (or a non-dairy alternative), ¼ cup of melted butter (or coconut oil), and 1 large egg. Whisk these ingredients together until they are well combined and smooth. This mixture will create a rich, flavorful base for your bread, enhancing its texture and taste.</p>
</p>
<h4>Combining Dry Ingredients: The Importance of Sifting</h4>
</p>
<p>Next, you’ll want to prepare the dry ingredients. In a separate bowl, sift together 3 cups of all-purpose flour, ⅓ cup of granulated sugar, and 1 teaspoon of salt. Sifting not only aerates the flour but also removes lumps, ensuring a uniform texture in your dough. This step is key to preventing any dry pockets within the bread.</p>
</p>
<h4>Forming the Dough: Tips for Achieving the Right Consistency</h4>
</p>
<p>Gradually add the dry ingredient mixture to the wet ingredients, stirring gently with a wooden spoon or spatula. The dough will start to come together, but it may be slightly sticky. If necessary, add a little more flour, one tablespoon at a time, until the dough pulls away from the sides of the bowl. The goal is to achieve a soft, pliable dough that is slightly tacky to the touch but not overly sticky.</p>
</p>
<h4>Kneading Techniques: Ensuring a Smooth and Elastic Dough</h4>
</p>
<p>Once your dough is formed, it’s time to knead. Turn the dough onto a lightly floured surface and knead it for about 8-10 minutes. Use the heel of your hand to push the dough away from you, then fold it back over itself. Repeat this motion, adding a sprinkle of flour as needed to prevent sticking. You’ll know it’s ready when the dough is smooth and elastic, bouncing back when pressed gently.</p>
</p>
<h4>First Rise: Best Practices for Creating the Ideal Environment</h4>
</p>
<p>After kneading, shape the dough into a ball and place it in a lightly greased bowl, turning it to coat all sides. Cover the bowl with a clean kitchen towel or plastic wrap. Set it in a warm, draft-free area to rise for about 1-2 hours, or until it has doubled in size. To create a warm environment, you can preheat your oven to 200°F (93°C), then turn it off and place the bowl inside. This gentle warmth will encourage the yeast to work its magic.</p>
</p>
<h4>Shaping the Dough: Techniques for Forming a Loaf</h4>
</p>
<p>Once the dough has risen, punch it down gently to release the air. Turn it out onto a floured surface and shape it into a rectangle. Fold the dough into thirds like a letter, then roll it from one short end to form a loaf shape. Pinch the seams to seal and place it seam-side down into a greased loaf pan. This shaping method helps create a tight structure that will result in a beautifully shaped loaf.</p>
</p>
<h4>Second Rise: Timing and Conditions for Optimal Puffiness</h4>
</p>
<p>Cover the loaf pan with a towel and let it rise again in a warm spot for about 30-45 minutes, or until it has doubled in size once more. This second rise is crucial for achieving a light, airy texture. While the dough is rising, take this time to preheat your oven to 350°F (177°C).</p>
</p>
<h4>Preheating the Oven: Importance of Temperature Control</h4>
</p>
<p>A well-preheated oven is vital for baking bread. It helps to create an immediate rise, or “oven spring,” when the dough first enters the heat. This sudden temperature change activates the yeast, allowing the bread to rise further and develop a nice crust. Ensure your oven is fully preheated before placing the loaf inside.</p>
</p>
<h4>Baking: How to Determine Doneness and Achieve a Golden Crust</h4>
</p>
<p>Bake the Sweet Dreams Bread in the preheated oven for about 30-35 minutes, or until the top is golden brown and sounds hollow when tapped. For an extra touch, you can brush the loaf with melted butter just before baking to enhance the crust’s flavor and appearance. To check for doneness, you can also use a thermometer; the internal temperature should reach 190°F (88°C) when fully baked.</p>
</p>
<h4>Cooling: Importance of Proper Cooling for Texture</h4>
</p>
<p>Once baked, remove the bread from the oven and let it cool in the pan for about 10 minutes. Then, transfer it to a wire rack to cool completely. Cooling the bread is essential as it allows the steam to escape, preventing the bread from becoming soggy. Waiting until the bread is completely cool ensures that the texture remains light and fluffy.</p>
</p>
<h3>Flavor Variations and Customization</h3>
</p>
<h4>Exploring Options for Adding Chocolate Chips or Nuts</h4>
</p>
<p>While Sweet Dreams Bread is delightful on its own, you can elevate the flavor by adding ingredients like chocolate chips or nuts. For a chocolatey twist, fold in about ½ cup of semi-sweet chocolate chips into the dough during the mixing stage. If you prefer a nutty flavor, consider adding ½ cup of chopped walnuts or pecans. Both options add texture and richness, making each slice even more indulgent.</p>
</p>
<h4>Suggestions for Alternative Sweeteners or Add-Ins</h4>
</p>
<p>If you’re looking to customize the sweetness of your bread, consider using alternative sweeteners. Substitute granulated sugar with honey, maple syrup, or agave nectar for a unique flavor profile. Keep in mind that liquid sweeteners may require adjusting the amount of flour slightly to maintain the right dough consistency. Additionally, spices like cinnamon or nutmeg can be added for a warm, aromatic touch.</p>
</p>
<h4>How to Adapt the Recipe for Different Dietary Preferences</h4>
</p>
<p>For those with dietary restrictions, Sweet Dreams Bread can be easily adapted. For a gluten-free version, use a 1:1 gluten-free flour blend in place of all-purpose flour. If you prefer a dairy-free option, substitute milk with almond milk or oat milk, and use a plant-based butter alternative. These changes allow everyone to enjoy this delicious bread without compromising on taste or texture.</p>
</p>
<h3>Serving Suggestions and Pairings</h3>
</p>
<h4>Ideas for Enjoying Sweet Dreams Bread</h4>
</p>
<p>Sweet Dreams Bread is beautifully versatile and can be enjoyed in numerous ways. Serve it warm, straight from the oven, or toasted for a delightful crunch. A simple spread of butter or margarine brings out the bread’s natural sweetness, while a drizzle of honey or maple syrup can elevate the experience even further.</p>
</p>
<h4>Serving It Plain vs. with Spreads</h4>
</p>
<p>While this bread is delightful on its own, consider pairing it with various spreads. Cream cheese, flavored with herbs or fruits, makes a fantastic topping. Alternatively, try nut butter for a protein-packed option or serve it alongside fruit preserves for a sweet contrast. Each option enhances the flavor and enriches your dining experience.</p>
</p>
<h4>Creative Uses for Leftover Bread</h4>
</p>
<p>If you find yourself with leftover Sweet Dreams Bread, don’t let it go to waste! Transform it into delightful French toast by dipping slices in an egg mixture and cooking them until golden brown. You can also use it for bread pudding, croutons, or even a sweet bread sandwich filled with your favorite ingredients. The possibilities are endless!</p>
</p>
<h3>Conclusion</h3>
</p>
<p>Baking Sweet Dreams Bread is not just about creating a delicious loaf; it’s about the joy and satisfaction that comes from the process. The aroma that fills your home, the anticipation of the first slice, and the warmth of sharing it with loved ones are what make this recipe truly special. As you experiment with different variations and flavors, remember that the essence of homemade bread lies in its ability to bring people together. Embrace the timeless tradition of baking and let Sweet Dreams Bread become a cherished part of your culinary repertoire. Whether you’re enjoying it at breakfast, as a snack, or as a centerpiece for family gatherings, this bread is sure to create happy memories in your kitchen for years to come.</p>
</div>

There's something undeniably comforting about the aroma of freshly baked bread wafting through your home. The anticipation that builds as you await the warm, golden loaf is a sensory experience that transcends the act of cooking—it evokes nostalgia, warmth, and an undeniable sense of satisfaction. Enter Sweet Dreams Bread, a delightful recipe that combines simplicity with indulgence, creating a loaf that is as versatile as it is delicious. Whether you enjoy it plain, toasted, or adorned with your favorite spread, this bread is sure to become a cherished staple in your kitchen.

Sweet Condensed Milk Bread

Discover the joy of baking with our Sweet Dreams Bread recipe, a delightful journey to homemade bliss. This rich and tender loaf features sweetened condensed milk, giving it a unique flavor and soft texture. Whether enjoyed plain, toasted, or customized with chocolate chips or nuts, it's perfect for breakfast, snacks, or dessert. Embrace the comforting aroma and warmth of freshly baked bread in your home and create lasting memories around the table with loved ones.

Ingredients
  

3 cups all-purpose flour

1/2 cup sweetened condensed milk

1/2 cup warm water (about 110°F or 43°C)

2 tablespoons granulated sugar

1 teaspoon instant yeast

1/4 teaspoon salt

1/4 cup unsalted butter, melted

1 large egg

1 teaspoon vanilla extract

Optional: 1/4 cup chocolate chips or nuts for added flavor

Instructions
 

Activate Yeast: In a small bowl, combine warm water, sugar, and instant yeast. Let it sit for about 5-10 minutes until it becomes frothy.

    Mix Wet Ingredients: In a large mixing bowl, whisk together the sweetened condensed milk, melted butter, egg, and vanilla extract. Once combined, add the frothy yeast mixture and stir until fully incorporated.

      Combine Dry Ingredients: In another bowl, sift together the all-purpose flour and salt.

        Form the Dough: Gradually add the dry mixture to the wet mixture, stirring with a wooden spoon or your hands until a soft dough forms. If it's too sticky, sprinkle in a little more flour. If desired, fold in the chocolate chips or nuts at this stage.

          Kneading: Transfer the dough onto a floured surface and knead for about 8-10 minutes until smooth and elastic.

            First Rise: Place the kneaded dough in a greased bowl, cover it with a clean towel or plastic wrap, and let it rise in a warm place for 1-2 hours, or until it has doubled in size.

              Shape the Dough: Once risen, punch down the dough to release air. Shape it into a loaf by rolling it into a rectangle and then rolling it tightly from one end to the other. Tuck the ends under and place it seam side down in a greased loaf pan.

                Second Rise: Cover the loaf pan with a cloth and let it rise again for about 30-45 minutes, until it puffs up just above the rim of the pan.

                  Preheat Oven: Meanwhile, preheat your oven to 350°F (175°C).

                    Bake: Bake the bread in the preheated oven for 25-30 minutes, or until golden brown and it sounds hollow when tapped on the bottom.

                      Cool Down: Once baked, let the bread cool in the pan for 10 minutes, then remove it and let it cool completely on a wire rack.

                        Serve: Slice and enjoy your Sweet Dreams Bread plain or with a spread of butter, jam, or even more sweetened condensed milk!

                          Prep Time: 20 minutes | Total Time: 3 hours | Servings: 10 slices

                            WANT TO SAVE THIS RECIPE?

                            Leave a Comment

                            Recipe Rating