Introduction
Strawberry shortcake is a timeless dessert that brings together the sweetness of ripe strawberries, the richness of whipped cream, and the light, fluffy texture of cake. This delightful treat has its roots in North American cuisine, where it has been enjoyed for generations. Its popularity stems not only from its incredible taste but also from its versatility and the ability to adapt to various occasions, be it a summer picnic, a birthday celebration, or a cozy family gathering.
The cultural significance of strawberry shortcake transcends borders, with each region offering its own unique twist on this beloved dessert. In the United States, strawberry shortcake is often associated with the warm months of spring and summer when fresh strawberries are in abundance. It’s a dessert that evokes feelings of nostalgia, often reminding people of sunny picnics and family gatherings where this dish would be the star of the show.
While store-bought versions of strawberry shortcake can be tempting, nothing compares to the taste and satisfaction of crafting this dessert from scratch. Homemade elements elevate the dish, allowing you to control the flavors and textures while using fresh, high-quality ingredients. In this guide, we will explore how to create luscious strawberry shortcake cups from scratch, ensuring that you impress your guests with a dessert that not only tastes amazing but also looks stunning.
Understanding the Components of Strawberry Shortcake
Creating the perfect strawberry shortcake cup involves understanding the essential components that make this dessert so delicious. Each layer plays a crucial role in contributing to the overall flavor and texture, and knowing how they interact can help you craft a dessert that is truly unforgettable.
The Essence of Strawberry Shortcake: A Layered Delight
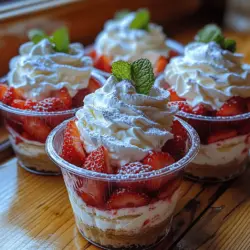
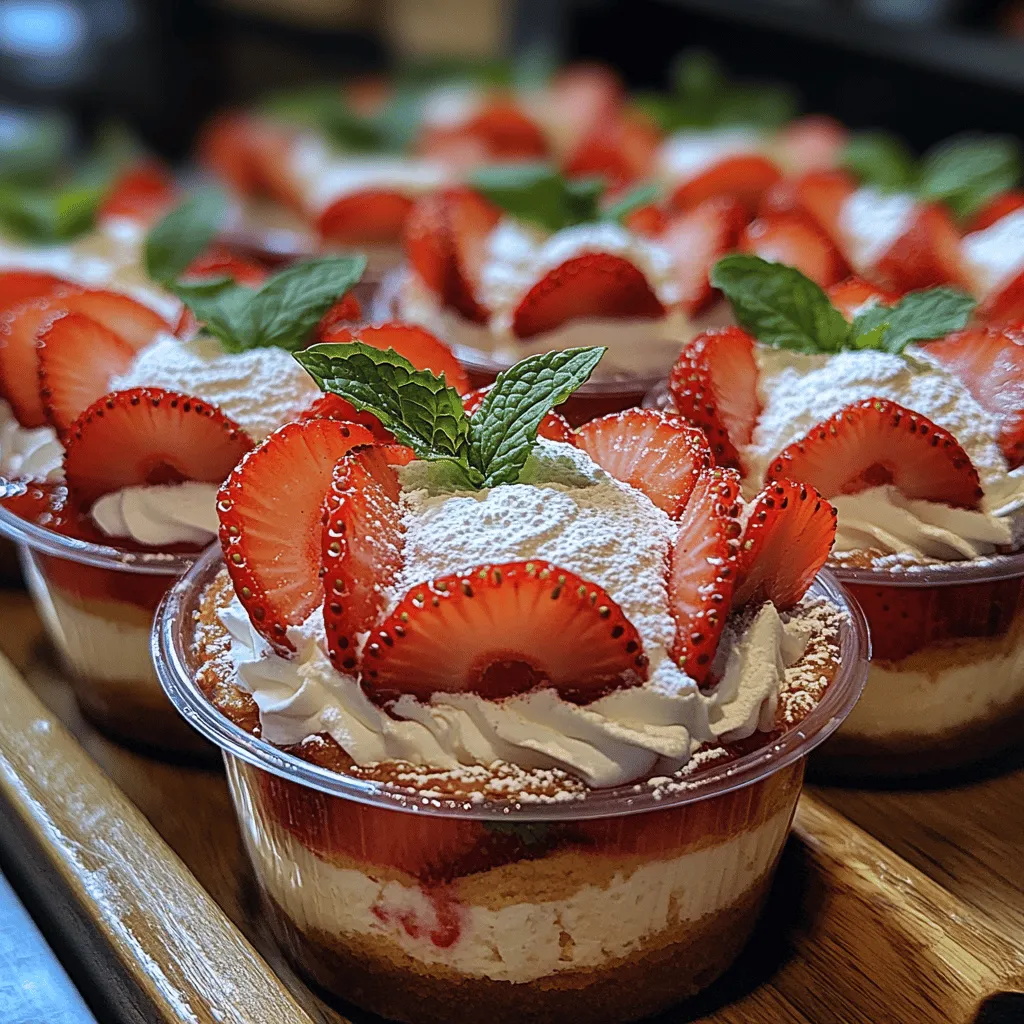
At its core, strawberry shortcake is a layered dessert that features three key components: the cake base, the strawberries, and the whipped cream. The harmony between these elements is what makes every bite a delightful experience.
1. Cake Base: The cake used in strawberry shortcake can vary widely, from traditional sponge cake to biscuit-style cakes. In our recipe, we will use a light and fluffy vanilla sponge cake that serves as the perfect foundation for the sweet strawberries and whipped cream.
2. Fresh Strawberries: The star of the show, fresh strawberries, are often macerated with a touch of sugar to enhance their sweetness and create a delicious syrup. This not only intensifies the flavor but also adds moisture to the dessert.
3. Whipped Cream: A generous dollop of freshly whipped cream completes the strawberry shortcake experience. The cream should be light and airy, providing a perfect contrast to the sweetness of the strawberries and the richness of the cake.
Exploring Traditional Ingredients
When crafting strawberry shortcake cups, it’s essential to select high-quality ingredients that will enhance the overall flavor of the dessert. Let’s take a closer look at the traditional components that you will need:
– Flour: All-purpose flour is typically used for the cake base, providing the necessary structure while keeping the cake light.
– Sugar: Granulated sugar adds sweetness to the cake and the strawberries, ensuring that each component is flavorful.
– Baking Powder: This leavening agent helps the cake rise, resulting in a fluffy texture.
– Butter: Unsalted butter adds richness to the cake and contributes to its moistness.
– Milk: Whole milk is preferred for its creaminess, which enhances the cake’s flavor.
– Eggs: Eggs provide moisture and stability, helping the cake achieve the desired texture.
– Vanilla Extract: Pure vanilla extract adds a wonderful aroma and flavor, elevating the overall dessert.
The Role of Cake, Strawberries, and Cream
Understanding how each component interacts is vital for creating the perfect strawberry shortcake cups. The cake acts as a sturdy base, while the strawberries provide a burst of freshness and sweetness. The whipped cream ties everything together, adding creaminess and lightness.
Types of Strawberry Shortcake: Regional Variations
Strawberry shortcake can take on many forms, depending on regional preferences and culinary traditions. Here are some popular variations:
– Traditional American Shortcake: Typically made with biscuits or sponge cake, this version is often layered with macerated strawberries and whipped cream.
– Japanese Strawberry Shortcake: A popular dessert in Japan, this version features light and airy sponge cake layered with whipped cream and strawberries, often decorated with additional fruit.
– Strawberry Shortcake Ice Cream: A fun twist on the classic, this variation combines the flavors of strawberry shortcake into a creamy ice cream form.
– Gluten-Free Strawberry Shortcake: For those with dietary restrictions, gluten-free versions can be made using alternative flours, ensuring that everyone can enjoy this delicious dessert.
Choosing the Right Ingredients
The success of your strawberry shortcake cups largely depends on the quality of the ingredients you choose. Let’s delve into some tips for selecting the best components for your dessert.
Selecting the Best Cake for Strawberry Shortcake
When it comes to the cake base, you have options. For our luscious strawberry shortcake cups, we recommend making a fluffy vanilla sponge cake. Here’s why:
– Fresh vs. Dried Cake: While store-bought cakes might be convenient, freshly baked cakes have a texture and flavor that cannot be matched. The lightness of a homemade sponge or biscuit will complement the strawberries and cream beautifully.
– No-Boil Cake Options: If you’re short on time, consider using a no-boil cake recipe that still delivers fluffy results without the lengthy baking process.
The Importance of Fresh Strawberries
Choosing the right strawberries is crucial for achieving the best flavor. Here are some tips:
– Look for Ripe Strawberries: Choose strawberries that are bright red, firm, and fragrant. These will be the sweetest and most flavorful.
– Macerating Strawberries: To enhance the flavor, consider macerating the strawberries. Simply toss them with a bit of sugar and let them sit for about 30 minutes. This process draws out the juices and creates a delicious syrup.
The Sauces That Make a Difference
While the traditional strawberry shortcake doesn’t require sauces, adding a drizzle of homemade sauce can elevate the dessert. Here are some suggestions:
– Balsamic Reduction: A balsamic glaze can add a unique twist, balancing the sweetness of the strawberries and adding depth of flavor.
– Chocolate Sauce: For chocolate lovers, drizzling a bit of chocolate sauce over the whipped cream can add an indulgent element.
Cheese Selection and Variations
For traditional strawberry shortcake, cheese is not typically included; however, you can enhance the whipped cream with a touch of mascarpone or cream cheese for added richness and flavor.
In the following sections, we’ll guide you through the step-by-step process of creating your luscious strawberry shortcake cups, ensuring that every layer is perfected. Prepare to delight your taste buds with this classic dessert that is sure to impress!
Step-by-Step Preparation of Homemade Lasagna
Homemade lasagna is a labor of love that pays off with every mouthful. The joy of layering fresh pasta, rich sauce, and creamy cheese is unmatched. This section will guide you through the detailed preparation, assembly, and baking of your lasagna, ensuring it turns out perfect every time.
Preparing the Sauce: The Foundation of Flavor
The sauce is the heart of your lasagna, bringing moisture and flavor to each layer. A well-crafted sauce can elevate your dish from ordinary to extraordinary.
Ingredients List for the Sauce:
– 2 tablespoons olive oil
– 1 medium onion, finely chopped
– 3-4 cloves garlic, minced
– 1 pound ground beef or Italian sausage (or a mix)
– 1 can (28 ounces) crushed tomatoes
– 2 tablespoons tomato paste
– 1 teaspoon dried oregano
– 1 teaspoon dried basil
– Salt and pepper to taste
– A pinch of sugar (optional, to balance acidity)
Cooking Instructions:
1. Sauté the Aromatics: In a large skillet or saucepan, heat the olive oil over medium heat. Add the chopped onion and sauté until it becomes translucent, about 5 minutes. Add the minced garlic and cook for an additional minute until fragrant.
2. Brown the Meat: Increase the heat to medium-high and add the ground beef or sausage. Cook until browned, breaking it up with a wooden spoon as it cooks. Drain excess fat if necessary.
3. Add Tomatoes and Seasonings: Stir in the crushed tomatoes, tomato paste, oregano, basil, salt, pepper, and sugar if using. Bring the sauce to a simmer, then reduce heat to low and allow it to simmer gently for at least 20-30 minutes. Stir occasionally to prevent sticking, and let the flavors meld together.
4. Taste and Adjust: Before removing the sauce from heat, taste and adjust seasoning as necessary. This step is crucial for ensuring the sauce is flavorful and well-balanced.
Tips for Enhancing Sauce Flavor with Aromatics
– For a deeper flavor, consider adding a splash of red wine after browning the meat, allowing it to cook down.
– Add a bay leaf during simmering for an added layer of flavor; just remember to remove it before layering your lasagna.
– Fresh herbs can also add brightness to your sauce; consider adding a handful of chopped basil or parsley at the end of cooking.
Assembling the Layers: The Art of Construction
Once your sauce is prepared and simmering, it’s time to assemble your lasagna. This process is where creativity comes into play.
Step-by-Step Layering Process:
1. Preheat the Oven: Begin by preheating your oven to 375°F (190°C).
2. Prepare Your Baking Dish: Lightly grease a 9×13-inch baking dish with olive oil or cooking spray to prevent sticking.
3. Layer the Ingredients:
– First Layer: Start with a thin layer of sauce at the bottom of the dish. This prevents the pasta from sticking to the pan.
– Pasta Layer: Place a layer of lasagna noodles over the sauce. If using no-boil noodles, ensure they are spread evenly without overlapping.
– Cheese Layer: Add a layer of ricotta cheese mixed with egg and herbs (if desired). Spread it evenly over the noodles.
– Add More Sauce: Spoon a generous amount of your meat sauce over the ricotta.
– Repeat: Continue this layering process until you reach the top, finishing with a final layer of noodles topped with sauce and a generous sprinkle of mozzarella cheese.
Tips for Even Distribution of Ingredients
– Use a spatula to spread cheese and sauce evenly across layers to ensure every bite has a balanced flavor.
– Avoid piling too much of any one ingredient in a layer; strive for thin, even layers for best results.
Importance of Balance Between Sauce, Cheese, and Fillings
– The key to a successful lasagna is balance; too much sauce can make it soggy while too little can result in a dry dish.
– Ensure each layer has a combination of sauce, cheese, and other fillings, like veggies or meats, for a harmonious taste.
Baking the Perfect Lasagna
Now that your lasagna is assembled, it’s time for the oven! Proper baking will ensure a beautiful, bubbly, and golden dish.
Optimal Baking Times and Temperatures:
– Cover the lasagna with aluminum foil and bake for 25 minutes. This helps to cook the noodles through.
– Remove the foil and bake for an additional 15-20 minutes, or until the cheese is melted and golden brown.
Tips for Achieving a Golden, Bubbly Top
– For an extra crispy top, consider broiling the lasagna for the last 2-3 minutes of baking—watch it closely to prevent burning!
– If you like a cheesier top, sprinkle an additional layer of mozzarella or parmesan cheese before the final bake.
The Importance of Resting Time Before Serving
Once baked, allow your lasagna to rest for at least 15-20 minutes before cutting. This resting period allows the layers to set, making it easier to slice and serve without falling apart.
Serving Suggestions and Pairings
Homemade lasagna is a star dish; however, pairing it with the right sides can enhance the dining experience.
Ideal Sides to Complement Your Lasagna
– Fresh Salads: A simple arugula or mixed greens salad with a light vinaigrette balances the richness of the lasagna. Adding cherry tomatoes, cucumbers, and shaved parmesan can elevate the salad further.
– Garlic Bread: Serve warm, buttery garlic bread on the side for dipping into leftover sauce or simply to enjoy as an appetizer.
Wine Pairings That Elevate the Meal
– A robust red wine like Chianti or a medium-bodied Merlot pairs beautifully with the tomato-based sauce. The acidity in the wine complements the flavors of the dish well.
– For white wine lovers, a crisp Sauvignon Blanc can cut through the richness of the cheese, providing a refreshing contrast.
Creative Ways to Serve Leftover Lasagna
Leftover lasagna can be just as delightful as the first serving with a few creative twists.
Reheating Tips for Optimal Taste:
– Reheat individual portions in the microwave or oven until heated through. For the oven, cover with foil to prevent the top from burning.
– Adding a sprinkle of fresh herbs or a dash of cheese before reheating can brighten the leftovers.
Ideas for Reinventing Leftovers in New Dishes:
– Chop leftover lasagna into bite-sized pieces and toss it with a salad for a unique pasta salad.
– Transform it into a lasagna soup by adding broth, vegetables, and simmering until heated through; this makes for a comforting and hearty dish.
Conclusion
Making homemade lasagna is more than just cooking; it’s about creating a dish filled with love and tradition. The joy of layering fresh ingredients, the aromatic scent wafting through your kitchen, and the satisfaction of sharing a homemade meal with loved ones are all part of this culinary experience.
As you explore different variations and personal touches, remember that the beauty of lasagna lies in its versatility. Whether you stick with classic flavors or experiment with new ingredients, every homemade lasagna is unique. Embrace your creativity, gather your favorite ingredients, and dive into the delicious world of lasagna-making. Enjoy every moment in the kitchen, and savor the delightful rewards at the table!