Chocolate éclairs are a classic French pastry that embodies the perfect combination of light, airy choux pastry, creamy pastry filling, and a rich chocolate glaze. This delightful dessert has been enjoyed for centuries and continues to be a favorite among pastry lovers worldwide. The name “éclair” itself translates to “flash of lightning” in French, thought to refer to the speed at which these treats can disappear once served. With their elegant appearance and indulgent flavors, chocolate éclairs are not just a dessert; they are a celebration of culinary artistry.
In this comprehensive guide, we will walk you through the process of creating these delectable treats from scratch, ensuring that you grasp each step with ease. Whether you’re a seasoned baker or a novice in the kitchen, our detailed instructions and insights will help you master the art of making irresistible chocolate éclairs. We’ll explore the foundational elements of this pastry, starting with the essential choux pastry, moving on to crafting the perfect pastry cream, and finally, glazing your éclairs to perfection.
Understanding Choux Pastry: The Foundation of Éclairs
Exploring the Origins of Choux Pastry
Choux pastry, or pâte à choux, has a fascinating history that dates back to the 16th century. It was initially developed in Italy and later refined in France, where it became a staple in French patisserie. The significance of choux pastry in French cuisine cannot be overstated; it serves as the foundation for a variety of beloved desserts, including cream puffs, profiteroles, and of course, éclairs.
What sets choux pastry apart from other types of pastry is its unique preparation method. Unlike traditional flaky pastries made with butter and flour, choux pastry is cooked on the stovetop before being baked. This cooking process allows the dough to become light and airy, creating a hollow center that can be filled with delicious creams and custards. The result is a pastry that is both delicate and sturdy, capable of holding its shape while providing a satisfying bite.
Key Characteristics that Make Choux Pastry Unique
Choux pastry has several distinctive characteristics that contribute to its popularity. First and foremost, it is incredibly versatile. The dough can be used for sweet or savory applications, allowing for endless creativity in the kitchen. Additionally, the texture of choux pastry is unmatched. It is light and airy, yet firm enough to support fillings without collapsing. The golden-brown exterior, achieved through the baking process, adds an appealing visual element that is hard to resist.
Another key feature of choux pastry is its ability to expand in the oven, thanks to the steam generated during baking. This steam creates pockets of air within the pastry, contributing to its characteristic puffiness. The result is a delightful contrast between the crunchy outer shell and the soft, creamy filling inside.
Essential Ingredients for Choux Pastry
Creating the perfect choux pastry requires a few essential ingredients, each playing a crucial role in the final product. Here’s a detailed breakdown of each ingredient’s role:
1. Water: Water is the primary liquid used in choux pastry. It helps to create steam during the baking process, which causes the pastry to puff up. Using cold water can help to create a more stable dough.
2. Butter: Butter adds flavor and richness to the pastry. It also contributes to the texture, helping to create a tender outer shell. Make sure to use unsalted butter for better control over the seasoning.
3. Flour: All-purpose flour is the main dry ingredient in choux pastry. It provides structure and stability to the dough. When mixed with the liquid and fat, it forms a paste that can be piped and baked.
4. Eggs: Eggs are essential for binding the ingredients together and providing the necessary moisture. They also contribute to the pastry’s rise and texture. The number of eggs used can vary depending on the desired consistency of the dough.
5. Salt: A pinch of salt enhances the flavor of the pastry. It balances the sweetness of any fillings and helps to elevate the overall taste.
Tips for Selecting the Best Quality Ingredients
When making choux pastry, the quality of your ingredients matters significantly. Here are a few tips for selecting the best ingredients:
– Butter: Choose a high-quality, unsalted butter for the best flavor and texture. Fresh butter with a high fat content will yield a richer pastry.
– Flour: Opt for all-purpose flour with a moderate protein content. This will provide adequate structure without making the pastry too tough.
– Eggs: Use fresh eggs for optimal results. Room temperature eggs incorporate more easily into the dough, creating a smoother mixture.
– Water: Use filtered water to avoid any unwanted flavors that could affect your pastry.
Step-by-Step Guide to Making Choux Pastry
Now that you understand the foundational elements of choux pastry, it’s time to dive into the step-by-step process of preparing the dough. Follow these instructions carefully, and you’ll be well on your way to creating delicious éclairs.
Instructions for Preparing the Dough
1. Preheat the Oven: Begin by preheating your oven to 425°F (220°C). This high temperature is crucial for creating steam and achieving the desired puffiness in your éclairs.
2. Combine Water and Butter: In a medium saucepan, combine the water and butter over medium heat. Stir until the butter has completely melted and the mixture reaches a gentle simmer.
3. Add Flour and Salt: Once the butter has melted, remove the saucepan from the heat. Carefully add the all-purpose flour and salt all at once, stirring vigorously with a wooden spoon or spatula. The mixture will clump together, forming a dough.
4. Cook the Dough: Return the saucepan to low heat and continue to cook the dough for about 1-2 minutes, stirring constantly. This step helps to dry out the dough slightly, allowing for better structure.
5. Incorporate the Eggs: Transfer the dough to a mixing bowl and let it cool for a few minutes. Once it’s cool enough to handle, add the eggs one at a time, mixing well after each addition. The dough should become smooth and glossy, and it should hold a stiff peak when lifted with a spatula.
6. Check the Consistency: The final dough should be thick but pipeable. If it appears too stiff, you can add a little water or an additional egg to achieve the desired consistency.
Common Mistakes to Avoid During the Choux Pastry Process
While making choux pastry can seem straightforward, there are a few common mistakes that can lead to less-than-perfect results:
– Under or Over-Cooking the Dough: Ensure that you cook the dough long enough to remove excess moisture, but avoid overcooking it, as this can lead to a dry pastry.
– Not Enough Eggs: Insufficient eggs will result in a dense pastry that doesn’t rise properly. Be sure to add the eggs gradually and check the consistency as you go.
– Opening the Oven Door: Avoid opening the oven door while the éclairs are baking, as this can cause them to deflate. It’s best to wait until they are fully baked before checking on them.
– Incorrect Piping Technique: Using the wrong piping tip or not piping with enough pressure can lead to irregular shapes. Practice your piping technique to ensure uniform éclairs.
Piping and Baking: Creating the Perfect Éclair Shape
Once you’ve prepared the choux pastry dough, the next step is piping it into the classic éclair shape and baking it to perfection.
Techniques for Piping Éclairs
Piping éclairs requires some practice, but with the right techniques, you can achieve beautiful, uniform shapes.
1. Choosing the Right Piping Tip and Bag: Use a large star tip (such as a Wilton 1M or 2D) for a classic éclair shape. A sturdy piping bag is essential; silicone or reusable fabric bags work well.
2. Piping the Dough: Fill your piping bag with the choux pastry dough, ensuring there are no air bubbles. Hold the piping bag at a 45-degree angle to the baking sheet and apply steady pressure while moving the bag in a straight line. Aim for éclairs that are about 4 inches long and 1 inch wide.
3. Achieving Uniform Size and Shape: To ensure even baking, try to pipe all éclairs to a similar size. You can also use a ruler to measure the length if you’re aiming for precision.
Baking Éclairs to Perfection
Baking is a critical step in the process of making éclairs. Follow these guidelines for optimal results:
1. Understanding Oven Temperatures: Bake the éclairs at 425°F (220°C) for the first 10-15 minutes. This initial high temperature helps to create steam, allowing the pastry to puff. After that, reduce the temperature to 375°F (190°C) and continue to bake for an additional 15-20 minutes.
2. Signs That Your Éclairs Are Baked Correctly: The éclairs should be golden brown and sound hollow when tapped on the bottom. Avoid opening the oven door until they are fully baked to prevent deflation.
3. Cooling: Once baked, remove the éclairs from the oven and let them cool on a wire rack. This prevents moisture from accumulating and keeps the pastry crisp.
With these foundational steps completed, you’re well on your way to mastering the art of chocolate éclairs. In the next section, we will delve into crafting the creamy pastry cream, which is essential for filling these delightful pastries. Stay tuned for the next steps in creating your irresistible chocolate éclairs!
Detailed Method for Cooking and Thickening Pastry Cream
Making pastry cream is a vital step in crafting the perfect chocolate éclairs. The process involves cooking milk, sugar, and egg yolks together, followed by thickening with cornstarch and butter for richness. Start by combining the milk and half of the sugar in a saucepan over medium heat. Bring the mixture to a gentle simmer, stirring occasionally to prevent the milk from scorching.
In a separate bowl, whisk together the egg yolks, the remaining sugar, and cornstarch until smooth and pale. Once the milk reaches a simmer, slowly pour it into the egg mixture while whisking constantly. This technique, known as tempering, prevents the eggs from scrambling. After combining, return the mixture to the saucepan and cook over medium heat, stirring continuously with a spatula or wooden spoon.
Continue cooking until the pastry cream thickens and bubbles gently, usually around 2-3 minutes. Once thickened, remove from heat and stir in vanilla extract and a pinch of salt for flavor enhancement. For an extra luxurious texture, incorporate cold butter into the cream, whisking until fully melted and combined. Transfer the cream to a bowl, cover with plastic wrap directly on the surface to prevent a skin from forming, and refrigerate until fully chilled.
Troubleshooting Common Issues with Pastry Cream
Even experienced bakers may encounter challenges when making pastry cream. Here are some common issues and their solutions:
1. Lumpy Pastry Cream: If your cream turns out lumpy, it may have cooked too quickly. Strain the cream through a fine-mesh sieve to remove lumps, then whisk until smooth.
2. Curdled Cream: If the cream appears curdled, it likely means the eggs were cooked too quickly. To salvage it, whisk vigorously to break up the curds. If necessary, strain it again.
3. Too Thin: If the pastry cream doesn’t thicken properly, return it to the heat and cook longer, stirring constantly until it reaches the desired consistency.
4. Too Thick: If your cream is too thick, you can thin it out by whisking in a small amount of milk or cream until you achieve the desired consistency.
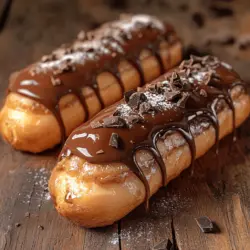
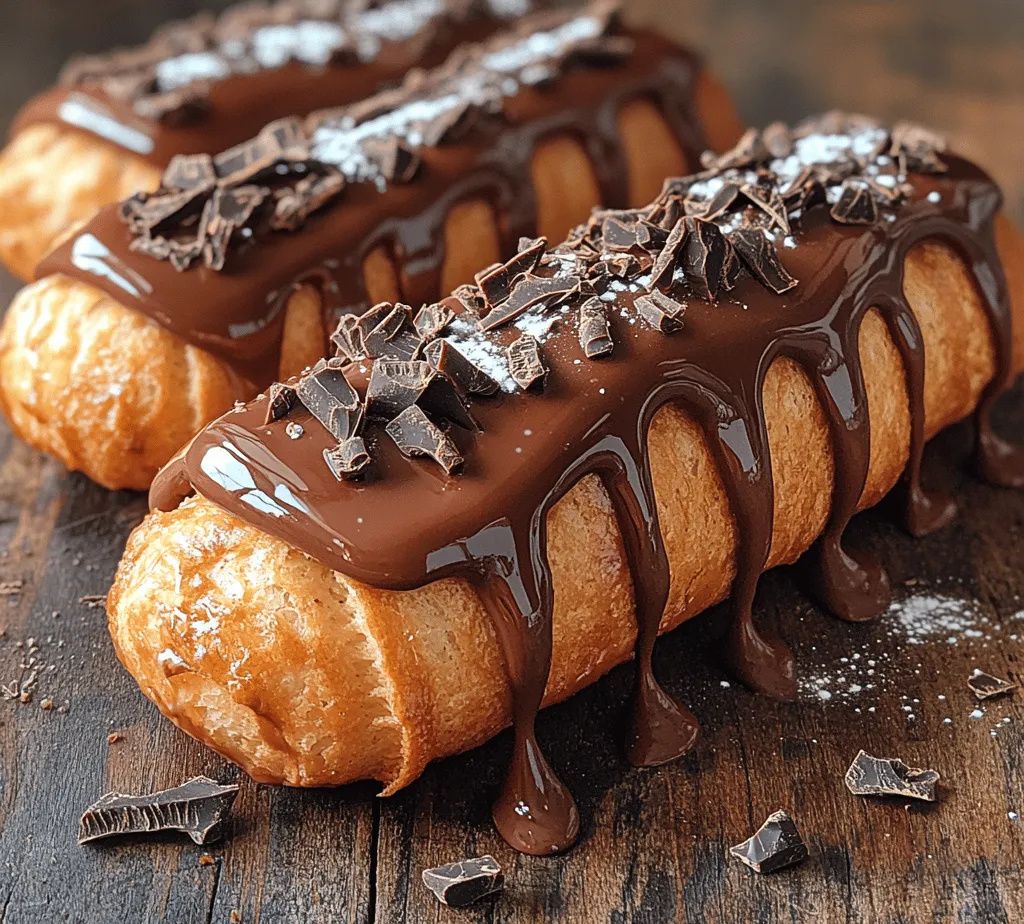
The Rich Chocolate Glaze: A Finishing Touch
The chocolate glaze is the crowning glory of your chocolate éclairs, providing a rich and glossy finish that enhances both presentation and flavor. A well-made chocolate glaze balances sweetness and bitterness, creating a harmonious flavor profile that complements the sweetness of the pastry cream and the slight crunch of the choux pastry.
Why Chocolate Glaze is the Ideal Topping
Chocolate glaze adds a beautiful sheen and depth of flavor that elevates chocolate éclairs from delicious to irresistible. It contrasts perfectly with the creamy pastry filling and soft pastry shell, creating an appealing textural experience that is both satisfying and indulgent.
Alternative Glaze Options for Different Tastes
While a classic chocolate glaze is always a hit, you can experiment with different flavors to suit your palate. Consider using:
– White Chocolate Glaze: For a sweeter, creamier alternative that pairs well with fruity fillings.
– Caramel Glaze: To add a hint of buttery sweetness that complements the chocolate.
– Coffee Glaze: Infusing your glaze with espresso powder for a mocha twist.
Ingredients Required for Chocolate Glaze
For a rich chocolate glaze, you will need:
– 8 ounces of semi-sweet or dark chocolate (choose quality chocolate for the best flavor)
– ½ cup of heavy cream
– 2 tablespoons of unsalted butter
Choosing the Right Type of Chocolate for the Glaze
The choice of chocolate significantly affects the taste and texture of your glaze. Semi-sweet chocolate is a popular choice due to its balance of sweetness and depth of flavor. Dark chocolate offers a more intense flavor, while milk chocolate provides a sweeter profile. For a nuanced glaze, consider using high-quality chocolate with a cocoa percentage of 60-70%.
How Cream and Butter Enhance the Glaze’s Richness
Heavy cream adds a luxurious texture to the glaze, ensuring it remains smooth and pourable. The butter contributes richness and glossiness, creating that professional finish you desire. Together, these ingredients create a glaze that not only enhances flavor but also elevates the overall presentation of your éclairs.
Step-by-Step Guide to Making Chocolate Glaze
1. Melt the Chocolate: Begin by chopping the chocolate into small pieces and placing it in a heatproof bowl.
2. Heat the Cream: In a small saucepan, heat the heavy cream over medium heat until it just begins to simmer.
3. Combine: Pour the hot cream over the chopped chocolate and let it sit for a minute to allow the chocolate to soften.
4. Stir Until Smooth: Using a whisk, gently stir the mixture until fully combined and smooth.
5. Add Butter: Incorporate the unsalted butter, whisking until melted and the glaze is glossy.
6. Cool Slightly: Let the glaze cool for a few minutes before using it to allow it to thicken slightly.
Instructions for Achieving a Smooth and Glossy Finish
To ensure your glaze is perfectly smooth, avoid stirring it too vigorously after combining the ingredients. Allow it to settle for a few minutes before using, which will help any bubbles rise to the surface and pop, resulting in a glossy finish.
Tips for Dipping Éclairs Without Making a Mess
1. Use a Dipping Fork: Insert a fork into the bottom of the éclair to hold it steady while dipping.
2. Dip Quickly: Dip each éclair into the glaze, allowing excess to drip off before placing it on a wire rack.
3. Work in Batches: If you’re glazing multiple éclairs, work in small batches to maintain control and avoid mess.
Assembling the Éclairs: The Final Steps
Once your pastry cream and chocolate glaze are prepared, it’s time to assemble your éclairs.
Techniques for Filling Éclairs with Pastry Cream
Filling the éclairs evenly with pastry cream ensures each bite is delectable. Here’s how to do it:
1. Prepare the Éclairs: Use a sharp knife to make a small slit on the underside of each éclair. This will be your filling point.
2. Fill a Piping Bag: Fit a piping bag with a long, narrow tip and fill it with the chilled pastry cream.
3. Inject the Cream: Insert the tip into the slit and gently squeeze the piping bag, filling the éclair until you feel the pastry expand slightly.
Methods for Ensuring Éclairs are Filled Evenly
To ensure uniform filling, practice a gentle squeezing motion and keep the piping bag at a consistent angle. It’s essential to feel the éclair expand as you fill it; this indicates that the cream is being distributed evenly.
How to Create the Perfect Slit or Hole for Filling
A small slit is sufficient for filling, but make sure it’s not too large, or the cream may ooze out. A 1-inch slit on one side of the éclair is ideal, allowing easy access for the piping tip.
Glazing and Presentation Tips
The final touch to your éclairs is glazing them beautifully.
Best Practices for Glazing Éclairs for a Professional Look
1. Use Fresh Glaze: Ensure your chocolate glaze is still warm and pourable for the best results.
2. Tilt the Éclair: When glazing, hold the éclair at a slight angle to allow the glaze to flow evenly across the top without pooling.
3. Allow Drip Time: After glazing, let excess glaze drip off before setting the éclairs on a cooling rack.
Ideas for Garnishing and Serving Your Éclairs Creatively
To elevate your presentation, consider the following garnishes:
– Chocolate Shavings: Sprinkle shaved chocolate on top of the glaze for added texture.
– Nuts: Chopped hazelnuts or almonds can add a delightful crunch.
– Edible Flowers: For a beautiful touch, garnish with edible flowers like violets or pansies.
Storing and Enjoying Your Éclairs
Proper storage is key to enjoying your homemade éclairs for days.
Best Practices for Storing Éclairs
To maintain freshness, store éclairs in an airtight container in the refrigerator. This helps to keep the pastry from becoming soggy while preserving the cream filling.
How to Keep Éclairs Fresh Without Compromising Texture
Avoid stacking your éclairs to prevent them from getting squished. Instead, place them in a single layer, separated by parchment paper, if needed. For the best taste and texture, consume them within 2-3 days of making.
Understanding the Shelf Life of Homemade Éclairs
Homemade éclairs are best enjoyed fresh, ideally within 24 to 48 hours. After that, while they may still be safe to eat, the texture and flavor may decline.
When to Serve Éclairs
Chocolate éclairs are versatile desserts that suit various occasions. They are perfect for:
– Celebrations: Birthdays, anniversaries, or gatherings.
– Afternoon Tea: Pair with tea or coffee for a delightful treat.
– Impressing Guests: Serve them at dinner parties for a touch of elegance.
Pairing Suggestions for Drinks and Other Desserts
For the ultimate indulgent experience, serve your éclairs with:
– Coffee: A rich espresso complements the chocolate beautifully.
– Dessert Wines: Sweet wines can enhance the dessert experience.
– Other Pastries: Create a dessert platter with macarons or mini tarts.
Conclusion: The Joy of Homemade Chocolate Éclairs
Creating chocolate éclairs at home is not only a rewarding baking project but also an opportunity to impress family and friends with your culinary skills. With the right techniques and a little patience, you can produce these delightful pastries that encapsulate the essence of French patisserie. Enjoying your homemade chocolate éclairs offers a sense of accomplishment and a taste of indulgence that is truly unmatched. Whether served at a celebration or enjoyed as a personal treat, these éclairs are sure to become a beloved recipe in your baking repertoire. Embrace the joy of baking and savor the delicious rewards!