Introduction
There’s something undeniably nostalgic about biting into a Hostess Cupcake. This beloved treat, with its rich chocolate cake, creamy filling, and signature swirl on top, has been a staple in American snack culture for decades. Whether you enjoyed them as a child or still indulge in them today, Hostess Cupcakes evoke memories of lunchbox surprises and after-school snacks. However, while these store-bought delights are convenient, many home bakers are discovering the joy of replicating this classic treat from scratch.
This article introduces you to a homemade version of Chocolate Hostess Cupcakes that captures the essence of the original while allowing for a personal touch. By crafting these cupcakes in your kitchen, you can ensure fresh ingredients and explore variations that cater to your taste preferences. With a focus on quality ingredients, this copycat recipe promises to deliver the same delicious flavor and texture you remember, with the added benefit of knowing exactly what goes into your treat.
Understanding the Appeal of Hostess Cupcakes
Historical Context
Hostess Cupcakes made their debut in 1919, quickly gaining popularity among consumers. Over the years, they have become a symbol of American snack culture, known for their iconic appearance and sweet, indulgent flavor. Their rich chocolate cake, combined with a creamy filling and topped with a decorative swirl, has captivated taste buds for generations. As a testament to their enduring appeal, Hostess Cupcakes have transitioned from a simple snack to a cultural icon, often found in lunchboxes, vending machines, and convenience stores across the nation.
The Allure of Homemade Versions
While the convenience of grabbing a packaged cupcake can be tempting, there’s something uniquely satisfying about creating your own versions at home. Homemade cupcakes offer several advantages:
1. Freshness: When you bake at home, you have the ability to use fresh ingredients, making your treats taste better. There’s nothing quite like the aroma of freshly baked cupcakes wafting through your kitchen.
2. Customization: Making cupcakes at home allows you to tailor the flavors and ingredients to your liking. Whether you prefer a richer chocolate flavor, a different filling, or a less sweet topping, the possibilities are endless.
3. Healthier Options: By baking your own cupcakes, you can control the sugar content and choose high-quality ingredients, making your treats a little healthier than their store-bought counterparts.
4. Joy of Baking: Baking can be a therapeutic activity, allowing you to unwind and express your creativity. The satisfaction of pulling a batch of beautifully crafted cupcakes from the oven is a rewarding experience that commercial snacks simply can’t replicate.
Ingredients Breakdown
Before diving into the baking process, it’s essential to understand the role each ingredient plays in creating the perfect Chocolate Hostess Cupcake. Here’s a breakdown of what you’ll need:
All-Purpose Flour
All-purpose flour serves as the foundation for your cupcakes, providing structure and stability. It’s versatile, making it suitable for a wide range of baked goods. The right amount of flour will ensure your cupcakes rise nicely without being too dense.
Cocoa Powder
Cocoa powder is crucial for achieving that rich chocolate flavor that is synonymous with Hostess Cupcakes. Using high-quality unsweetened cocoa powder will enhance the depth of flavor in your cake, providing that indulgent chocolate experience.
Sugar
Sugar is not just for sweetness; it also contributes to the moisture content of the cupcakes. It helps create a tender crumb and balances the bitterness of the cocoa, making your cupcakes delectable.
Egg
Eggs are essential in baking as they act as a binding agent, holding all the ingredients together while providing structure. They also contribute to the leavening process, helping your cupcakes rise to fluffy perfection.
Milk and Oil
Milk adds moisture to the batter, resulting in a tender cupcake, while oil contributes to a moist texture. The combination of these liquids ensures your cupcakes remain soft and delicious.
Baking Soda and Baking Powder
These leavening agents are crucial for achieving the right rise and fluffiness in your cupcakes. Baking soda reacts with the acidic ingredients in the batter, while baking powder provides additional leavening, ensuring your cupcakes have the perfect lift.
Vanilla Extract
A splash of vanilla extract enhances the overall flavor profile of your cupcakes. Its sweet and aromatic notes complement the chocolate, making every bite more satisfying.
Special Ingredients for the Filling and Ganache
To achieve that signature Hostess Cupcake experience, you’ll also need a few special ingredients for the filling and ganache:
– Marshmallow Fluff: This fluffy, sweet filling is key to replicating the creamy center of a Hostess Cupcake. It adds a delightful texture and sweetness that contrasts beautifully with the chocolate cake.
– Heavy Cream: Used in both the filling and the ganache, heavy cream contributes to the richness and smoothness of these components. It’s essential for creating a luscious chocolate ganache that coats the cupcakes perfectly.
Step-by-Step Guide to Making Copycat Chocolate Hostess Cupcakes
Before you start, it’s important to prepare your kitchen and gather all the essential tools and equipment you’ll need for this baking adventure.
Preparing the Kitchen: Essential Tools and Equipment Needed
1. Oven: Preheat your oven to 350°F (175°C) to ensure it’s ready for your cupcakes.
2. Cupcake Pan: Use a standard 12-cup cupcake pan to bake your cupcakes. If you have a non-stick pan, it will help prevent sticking.
3. Cupcake Liners: Paper liners are essential for easy removal of the cupcakes and add an aesthetic touch.
4. Mixing Bowls: Have a large mixing bowl for combining dry ingredients and another for wet ingredients.
5. Electric Mixer: A hand or stand mixer will make it easier to cream the butter and sugar and combine the batter smoothly.
6. Measuring Cups and Spoons: Accurate measurements are crucial in baking, so ensure you have both dry and liquid measuring tools.
7. Spatula: A rubber spatula is great for folding ingredients and scraping the sides of the bowls.
8. Piping Bag: For filling the cupcakes and creating the decorative swirl on top, a piping bag or a resealable plastic bag with the corner snipped off will work well.
9. Cooling Rack: Allow your cupcakes to cool completely on a wire rack before frosting, ensuring the icing doesn’t melt.
With your kitchen set up and ingredients gathered, you’re ready to embark on the delicious journey of creating your very own copycat Chocolate Hostess Cupcakes. In the next section, we will provide you with detailed step-by-step instructions to guide you through the baking process, ensuring your cupcakes turn out perfectly every time. Get ready to indulge in a homemade treat that captures the classic taste of Hostess Cupcakes, and enjoy the sweet reward of your baking efforts!
Crafting the Chocolate Cupcakes
Creating the perfect Copycat Chocolate Hostess Cupcakes starts with the chocolate cupcake itself. The foundation of this delightful treat requires a careful balance of ingredients that yield a moist and fluffy texture. Below are detailed instructions for mixing and baking the cupcakes.
Detailed Instructions for Mixing and Baking
1. Preheat the Oven: Begin by preheating your oven to 350°F (175°C). This ensures that your cupcakes bake evenly.
2. Prepare the Baking Pan: Line a standard cupcake pan with cupcake liners. This will make it easier to remove the cupcakes after baking and will also help maintain their shape.
3. Combine Dry Ingredients: In a medium bowl, whisk together 1 cup of all-purpose flour, 1 cup of granulated sugar, 1/3 cup of unsweetened cocoa powder, 1 teaspoon of baking soda, 1/2 teaspoon of baking powder, and a pinch of salt. This combination creates a rich, chocolatey base for your cupcakes.
4. Mix Wet Ingredients: In a separate bowl, mix together 1/2 cup of vegetable oil, 1 teaspoon of vanilla extract, 1 tablespoon of white vinegar, and 1 cup of cold water. The vinegar reacts with the baking soda to create a light and airy cupcake.
5. Combine Mixtures: Gradually add the wet ingredients to the dry ingredients, stirring until just combined. Be careful not to overmix; a few small lumps are okay.
6. Fill the Cupcake Liners: Pour the batter into the prepared cupcake liners, filling each about 2/3 full. This allows room for the cupcakes to rise without overflowing.
7. Bake: Place the cupcake pan in the preheated oven and bake for 18-20 minutes, or until a toothpick inserted into the center comes out clean.
8. Cool: Once baked, remove the cupcakes from the oven and let them cool in the pan for about 5 minutes before transferring them to a wire rack to cool completely.
Tips for Achieving Moist and Fluffy Cupcakes
– Don’t Overmix: As mentioned, overmixing can lead to dense cupcakes. Mix just until combined for a lighter texture.
– Use Room Temperature Ingredients: Allow your eggs and any other refrigerated ingredients to come to room temperature before mixing. This helps in achieving a better emulsion and texture.
– Check Oven Temperature: Use an oven thermometer to ensure your oven is at the correct temperature. An oven that runs too hot can dry out your cupcakes.
Making the Cream Filling
The cream filling is what makes these cupcakes reminiscent of the beloved store-bought version. It’s essential to achieve the right consistency and flavor.
Techniques for Achieving the Perfect Consistency
1. Ingredients: You will need 1/2 cup of unsalted butter (softened), 1 cup of powdered sugar, 1 teaspoon of vanilla extract, and 1-2 tablespoons of heavy cream or milk.
2. Mixing: In a medium bowl, beat the softened butter until creamy. Gradually add the powdered sugar, mixing until smooth. Add the vanilla extract and enough heavy cream to reach a thick yet spreadable consistency.
3. Taste: Adjust sweetness and creaminess by adding more sugar or cream as necessary.
Tips for Piping and Filling the Cupcakes Effectively
– Use a Piping Bag: Fill a piping bag fitted with a large round tip with the cream filling. This will help you fill the cupcakes neatly and evenly.
– Create a Well: Before filling, use a small knife or cupcake corer to create a well in the center of each cupcake. This allows for a generous amount of filling.
– Fill Generously: Don’t be shy with the filling! A well-filled cupcake is part of what makes these treats so indulgent.
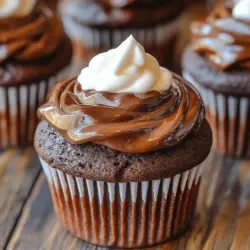
Creating the Chocolate Ganache
The final touch to these cupcakes is the rich chocolate ganache. This glossy coating provides a beautiful finish and an extra layer of chocolate flavor.
Explanation of the Ganache Process and Its Importance
Ganache is a simple mixture of chocolate and cream that can be used for glazing or filling. When made correctly, it results in a smooth and shiny finish that elevates your cupcakes.
1. Ingredients: For the ganache, you’ll need 8 ounces of semi-sweet chocolate (chopped) and 1 cup of heavy cream.
2. Heating the Cream: In a saucepan over medium heat, bring the heavy cream to a gentle simmer.
3. Mixing: Once the cream is simmering, pour it over the chopped chocolate in a heatproof bowl. Let it sit for a minute to soften the chocolate, then whisk until smooth and glossy.
Tips for Achieving a Smooth and Glossy Finish
– Use Quality Chocolate: The type of chocolate you use will greatly impact the flavor and texture of your ganache. Choose a good quality semi-sweet chocolate for the best results.
– Cool Before Dipping: Allow the ganache to cool slightly before dipping the cupcakes. It should still be pourable but not too hot to ensure it adheres well.
– Avoid Air Bubbles: When whisking the ganache, do so gently to avoid incorporating air bubbles, which can mar the finish.
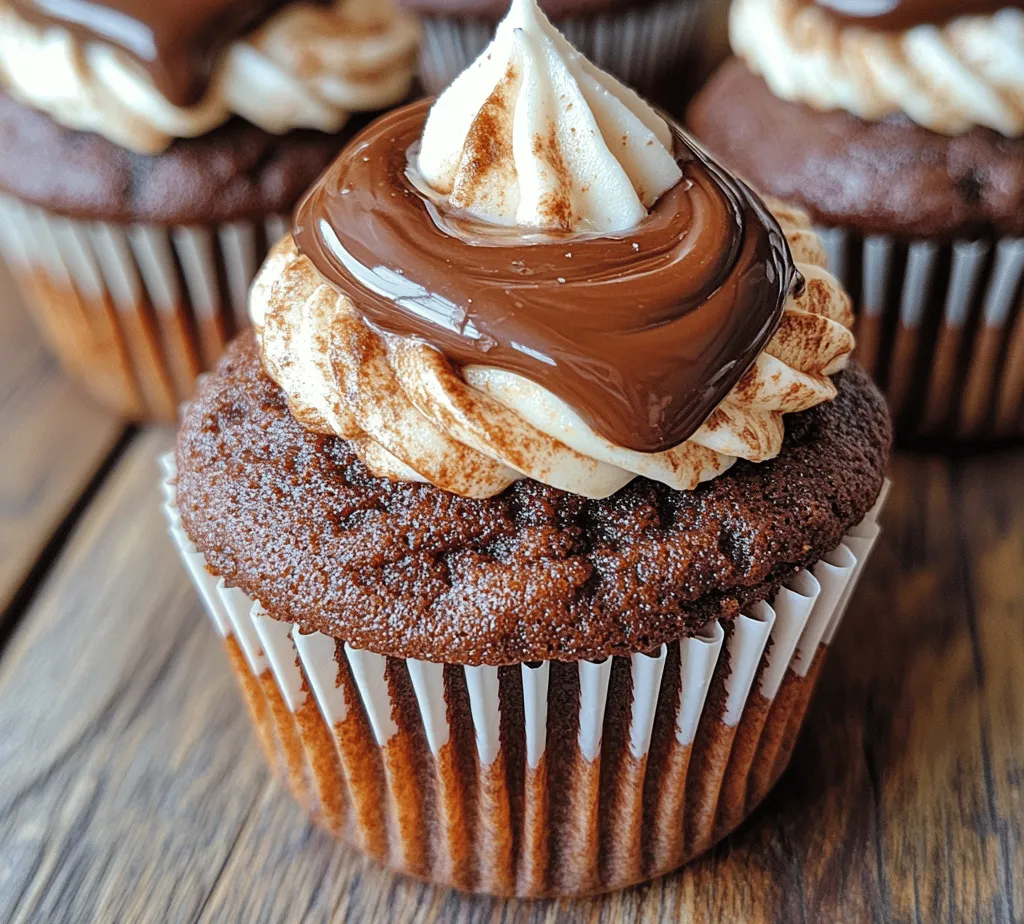
Assembling Your Cupcakes
Once your cupcakes are cooled and your fillings are prepared, it’s time to assemble your delicious Copycat Chocolate Hostess Cupcakes.
Step-by-Step Instructions for Assembling the Cupcakes
1. Fill the Cupcakes: Using your prepared piping bag, fill each cupcake with the cream filling until you see a slight dome on top.
2. Prepare for Dipping: Place the filled cupcakes on a wire rack set over a baking sheet to catch any excess ganache.
3. Dip in Ganache: Gently dip the top of each cupcake into the chocolate ganache, allowing excess to drip off.
4. Smooth the Finish: If needed, use a spatula to smooth out any uneven areas on top of the cupcake.
5. Set the Ganache: Leave the cupcakes on the wire rack for the ganache to set, which should only take about 10-15 minutes.
Techniques for Dipping and Ensuring Even Coverage with Ganache
– Use a Tall Container: To make dipping easier, use a tall container for your ganache so that you can fully submerge the tops of the cupcakes.
– Tilt the Cupcake: When dipping, tilt the cupcake slightly to help coat the sides for an even layer.
– Let Excess Drip: Allow the ganache to drip off for a few moments before moving the cupcake; this prevents pooling at the base.
Optional Presentation Ideas for Serving
– Decorative Sprinkles: Add colorful sprinkles on top of the ganache while it’s still wet for a festive touch.
– Chocolate Drizzle: After the ganache sets, you can drizzle melted white chocolate or additional ganache over the top for an elegant finish.
– Serve with Fresh Berries: Pair the cupcakes with fresh strawberries or raspberries on the side for a pop of color and tartness.
Serving Suggestions and Pairings
These Copycat Chocolate Hostess Cupcakes are perfect for various occasions, from birthday parties to casual get-togethers. Here are some ideas for what to serve alongside them.
Ideas for What to Serve Alongside These Cupcakes
– Ice Cream: A scoop of vanilla or chocolate ice cream complements the rich chocolate flavor beautifully.
– Coffee or Tea: A warm cup of coffee or tea pairs excellently, enhancing the overall experience.
– Fruit Salad: A light and refreshing fruit salad can balance the richness of the cupcakes.
Beverage Pairings That Complement the Rich Chocolate Flavor
– Milk: A classic pairing, a cold glass of milk is perfect for washing down these sweet treats.
– Dessert Wine: Consider serving with a light dessert wine, such as a late harvest Riesling, which can complement the sweetness nicely.
– Craft Beer: A stout or porter can also make an intriguing pairing, as its flavors often echo chocolate notes.
Creative Serving Ideas for Special Occasions
– Themed Parties: For a chocolate-themed party, consider using chocolate-colored table settings and serving chocolate-flavored beverages alongside your cupcakes.
– Gift Boxes: Package cupcakes in decorative boxes as thoughtful homemade gifts for friends and family.
– Cupcake Towers: Create a stunning display by stacking cupcakes on a tiered stand for events like weddings or birthdays.
Storing and Enjoying Your Cupcakes
To ensure your homemade Copycat Chocolate Hostess Cupcakes stay fresh and delicious, proper storage is essential.
Proper Storage Methods to Maintain Freshness and Taste
– Room Temperature: Cupcakes can be stored at room temperature for up to 2 days in an airtight container.
– Refrigerate: If you want to keep them longer, they can be refrigerated for up to a week, although this may affect texture slightly.
Tips on Reheating or Refreshing Cupcakes Before Serving
– Room Temperature: If stored in the fridge, bring the cupcakes to room temperature before serving for the best flavor and texture.
– Microwave: For a warm treat, briefly microwave a cupcake for about 10-15 seconds. This will revitalize the flavors and make the ganache slightly melty.
Duration for Which the Cupcakes Can Be Stored Without Losing Quality
When properly stored, your cupcakes can last about 5-7 days. If you have leftovers, freezing them is an option, extending their shelf life to about 3 months.
Conclusion
Making Copycat Chocolate Hostess Cupcakes at home is a rewarding and delightful experience. Not only do you get to enjoy the rich, chocolatey goodness, but you also have the satisfaction of creating something from scratch. Whether you stick to the classic recipe or decide to experiment with flavors and variations, these cupcakes are sure to impress your family and friends.
So go ahead, roll up your sleeves, and indulge in the joy of baking. Whether served at a party, given as gifts, or simply enjoyed as a sweet treat at home, these cupcakes are bound to bring smiles and sweet memories. Happy baking!