Introduction
Apple pie is more than just a dessert; it’s a symbol of comfort, nostalgia, and tradition deeply woven into the fabric of American culinary heritage. For generations, families have gathered around the kitchen table to bake, share, and enjoy this classic treat, evoking memories of home and togetherness. The appeal of apple pie lies not only in its delightful taste but also in the joy of homemade baking that transcends generations. Using fresh, high-quality ingredients is paramount to achieving that perfect balance of sweetness and tartness, creating a pie that is truly a delight.
In this article, we introduce the Classic Apple Pie Delight—a recipe that encapsulates the essence of apple pie with a flaky crust, a mouthwatering apple filling, and a hint of warm spices. What makes this recipe special is its simplicity paired with quality ingredients, ensuring that every bite is filled with rich flavors and a satisfying texture. Whether you are a seasoned baker or a novice in the kitchen, this recipe will guide you through each step, allowing you to create a pie that is not only delicious but also a beautiful centerpiece for any occasion.
The Essence of Apple Pie
Historical Background of Apple Pie in American Culture
The origins of apple pie can be traced back to the 14th century in England, where the earliest recipes included apples, spices, and a pastry crust. However, it was in America where the apple pie truly flourished and became a cultural icon. Early American settlers brought apple seeds and pie-making traditions with them, and over time, apple pie became associated with American values such as hard work, family, and home. The phrase “as American as apple pie” emerged in the 20th century, solidifying the dessert’s status as a symbol of national pride.
The Evolution of Apple Pie Recipes Over the Years
Throughout the years, apple pie recipes have evolved, reflecting the changing tastes and available ingredients of each era. In the early days, pies were often made with whatever fruits were in season, but as apple cultivation became widespread in the United States, the focus shifted to showcasing apples as the star ingredient. Variations emerged, such as Dutch apple pie with a crumb topping and caramel apple pie with rich caramel sauce. Modern adaptations have also introduced healthier alternatives, using less sugar or incorporating whole grains in the crust.
Common Variations and Regional Adaptations of Apple Pie
Across the United States, apple pie takes on many forms, with each region boasting its own unique twist. For instance, in the Northeast, you might find a traditional double-crust apple pie, while the Midwest is known for its deep-dish versions filled to the brim with tart apples. Southern apple pies often include a buttery crumb topping, adding a delightful crunch. Additionally, some recipes incorporate spices like allspice and ginger, while others may use different types of apples, allowing for a diverse range of flavors and textures.
Understanding the Ingredients
To create the perfect Classic Apple Pie Delight, understanding the ingredients is essential. Each component plays a vital role in achieving a delicious and satisfying pie.
Detailed Description of the Flaky Crust Components
The foundation of any great apple pie is its crust. A flaky, buttery crust elevates the apple filling, providing a satisfying contrast in texture. Here are the key ingredients:
– All-Purpose Flour: The primary ingredient for the crust, all-purpose flour provides structure. Look for a brand that has a good protein content, which helps the dough hold together while still being tender.
– Butter: Unsalted butter is preferred for pie crusts as it allows you to control the salt content. The fat in the butter contributes to the flakiness of the crust, creating a tender and rich flavor.
– Sugar: A small amount of sugar is added to the crust to enhance the flavor and assist in browning. It also helps the crust to achieve that perfect golden color.
– Salt: A pinch of salt is essential for balancing flavors and enhancing the overall taste of the crust.
– Ice Water: Adding ice water to the dough helps to bind the ingredients without warming the butter, which is crucial for achieving flakiness.
Importance of Each Ingredient
Choosing the right ingredients can make or break your apple pie. For flour, select a brand that is known for its quality and consistency. When it comes to butter, opt for high-fat content options like European-style butter, which has a richer flavor and contributes to a flakier crust. For sugar, use granulated sugar in the crust while reserving brown sugar for the filling, which adds depth and a hint of caramel flavor.
Pro Tips for Selecting the Best Butter and Flour
When selecting butter, look for brands that specify a high butterfat content, as this will enhance the richness of your crust. For flour, consider using a blend of all-purpose flour and pastry flour for a lighter texture. Always check for fresh flour, as old flour can impart a stale taste to your pie.
In-Depth Look at the Apple Filling Ingredients
The filling is where the magic happens, and selecting the right apples is crucial for achieving the best flavor. The ideal apple filling balances sweetness with tartness, providing a complex flavor profile.
– Tart Apples: For a classic apple pie, tart apple varieties like Granny Smith, Honeycrisp, or Braeburn are recommended. These apples hold their shape during baking and add a refreshing tartness that complements the sweetness of the sugar.
– Spices: Traditional spices like cinnamon and nutmeg are essential for enhancing the flavors of the apples. A touch of lemon juice can also brighten the filling and prevent the apples from browning.
– Thickening Agents: Flour is commonly used as a thickening agent in apple pie fillings. It absorbs the juices released by the apples during baking, creating a luscious, cohesive filling.
The Role of Tart Apples and Suggested Varieties
Tart apples are the backbone of a great apple pie. Granny Smith apples are a favorite due to their firm texture and tart flavor, making them perfect for baking. Honeycrisp apples offer a balance of sweetness and tartness, while Braeburn apples add a unique flavor that is both sweet and tangy. A mixture of these apples can create a multidimensional filling that is both flavorful and texturally interesting.
Spices and Their Impact on Flavor Profile
Spices play a pivotal role in transforming the apple filling into something extraordinary. Cinnamon is the star spice in most apple pie recipes, providing warmth and familiarity. A pinch of nutmeg adds depth, while allspice and ginger can introduce a hint of warmth and complexity. Lemon juice not only enhances the flavor but also helps to maintain the apples’ vibrant color.
The Purpose of Thickening Agents in Pie Fillings
The thickening agent in apple pie filling, usually flour, is essential for creating a cohesive mixture that binds the apples and juices together. Without it, the filling can become too runny, leading to a soggy crust. Flour also helps to absorb excess moisture, ensuring that your apple pie has the perfect texture.
Preparing the Flaky Crust
Creating a flaky pie crust is both an art and a science. Follow these steps to ensure your crust turns out perfectly every time.
Step-by-Step Guide to Making the Perfect Flaky Crust
1. Chill the Ingredients: Start by chilling your butter and water. Cold ingredients prevent the butter from melting before the pie is baked, resulting in a flaky texture.
2. Mix the Dry Ingredients: In a large bowl, combine the all-purpose flour, sugar, and salt. Whisk together to ensure even distribution.
3. Cut in the Butter: Using a pastry cutter or your fingers, cut the cold butter into the flour mixture until it resembles coarse crumbs. You should see small pea-sized pieces of butter throughout the mixture.
4. Add Ice Water: Gradually add ice water, one tablespoon at a time, mixing gently until the dough begins to come together. Be careful not to overmix; you want to see bits of butter for flakiness.
5. Form the Dough: Divide the dough into two equal portions, shaping each into a disc. Wrap them in plastic wrap and refrigerate for at least one hour.
Importance of Chilling Butter and Dough
Chilling the butter and the dough is crucial for creating a flaky crust. When the cold butter melts in the oven, it creates steam, which results in the flaky layers. If the butter is too warm when mixed, it will not create the desired texture.
Techniques for Mixing Ingredients to Achieve the Right Texture
For a flaky crust, handle the dough as little as possible. Overworking it can lead to a tough texture. Use a gentle folding motion when incorporating the ice water and be mindful of keeping the butter pieces intact.
Tips for Dividing and Storing Dough Effectively
When dividing the dough, use a sharp knife or a bench scraper to avoid compressing the dough. If you’re not using the dough immediately, it can be frozen for up to three months. Just be sure to wrap it tightly in plastic wrap and label it for easy identification.
Creating the Apple Filling
The apple filling is the heart of the Classic Apple Pie Delight. Preparing the apples correctly will ensure that your filling is flavorful and well-textured.
Techniques for Preparing Apples: Peeling, Coring, and Slicing
1. Peeling: Use a sharp vegetable peeler to remove the skin from the apples. This step is essential, as the skin can create a chewy texture that detracts from the eating experience.
2. Coring: After peeling, use an apple corer or a small knife to remove the core from each apple. This step is crucial for ensuring that every bite is filled with tender apple slices.
3. Slicing: Slice the apples into even pieces, about 1/4 inch thick. Uniform slices will help the apples cook evenly, resulting in a perfectly textured filling.
By following these steps and understanding the significance of each ingredient, you are well on your way to creating a delicious Classic Apple Pie Delight. In the next part of this article, we will delve deeper into assembling the pie and the baking process, ensuring that your apple pie turns out beautifully every time.
Classic Apple Pie Delight
Importance of Letting the Filling Sit to Enhance Flavor
Before diving into the preparation of your classic apple pie, it is crucial to allow your apple filling to sit for a while after mixing. This simple step can significantly elevate the flavor profile of your pie. When you combine the apples with sugar, spices, and lemon juice, the sugar draws out the natural juices from the apples. Allowing the filling to rest for about 30 minutes lets these juices mingle with the sugars and spices, creating a more cohesive and flavorful filling. The result is a rich, sweet, and tart mixture that will infuse your pie with deliciousness.
Balancing sweetness and tartness is essential for the perfect apple pie filling. Choose a mix of sweet and tart apples, such as Granny Smith and Honeycrisp or Fuji. The tart apples lend a refreshing zing that counterbalances the sweetness of the sugar and cinnamon, ensuring that your pie is not overly sweet. Aim for a harmonious blend of flavors that will keep everyone coming back for a second slice.
Rolling Out the Dough
To achieve the perfect crust for your classic apple pie, rolling out the dough correctly is essential. Here are some best practices to follow:
Tools Needed
– Rolling Pin: A sturdy rolling pin is indispensable for flattening your dough evenly.
– Pastry Mat: A non-stick pastry mat provides a clean surface for rolling and helps prevent sticking.
– Bench Scraper: This tool is helpful for lifting and maneuvering the dough without tearing it.
Tips for Achieving the Right Thickness and Shape
1. Chill the Dough: Ensure your pie dough is well-chilled before rolling. This helps maintain its structure and prevents it from becoming too soft. If the dough feels sticky, refrigerate it for an additional 15-20 minutes.
2. Flour Your Surface: Lightly dust your pastry mat and rolling pin with flour to prevent sticking. Be cautious not to over-flour, as this can make the dough tough.
3. Roll from the Center: Start rolling from the center of the dough outwards, turning it occasionally to maintain a circular shape. Aim for a thickness of about 1/8 to 1/4 inch for the bottom crust.
4. Measure as You Go: Keep your pie dish nearby to ensure your dough is large enough to cover the sides. A properly rolled crust should hang over the edges of the dish by about an inch.
5. Transfer with Care: Use your rolling pin to gently lift the rolled-out dough and transfer it to your pie dish, ensuring it doesn’t stretch or tear.
Assembling the Pie
Assembling your classic apple pie is where the magic truly happens. Follow these guidelines to create a beautiful pie that not only tastes fantastic but also looks impressive.
Pouring and Distributing the Apple Filling
Once your filling has rested, pour it into the prepared bottom crust. Use a slotted spoon to transfer the apples, allowing any excess liquid to drain off. This prevents a soggy bottom crust. Spread the apples evenly, ensuring that they are well-distributed throughout the pie dish.
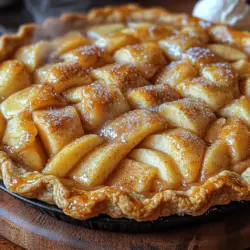
Creating a Top Crust: Lattice vs. Full Crust
You have two popular options for your top crust:
1. Full Crust: Roll out a second piece of dough to cover the entire pie. Cut slits in the top to create ventilation and allow steam to escape during baking. This method provides a classic look and offers a beautiful, golden-brown crust.
2. Lattice Crust: For a decorative touch, consider a lattice crust. Roll out your dough and cut it into strips about 1 inch wide. Weave the strips over and under each other to create a crisscross pattern. This not only looks stunning but also allows steam to escape while showcasing the delicious filling.
Regardless of the method you choose, it’s vital to seal the edges properly. Crimp the edges with your fingers or a fork to ensure a tight seal, preventing juices from leaking out during baking.
Finishing Touches for a Beautiful Pie
The final touches can make a significant difference in the appearance of your classic apple pie.
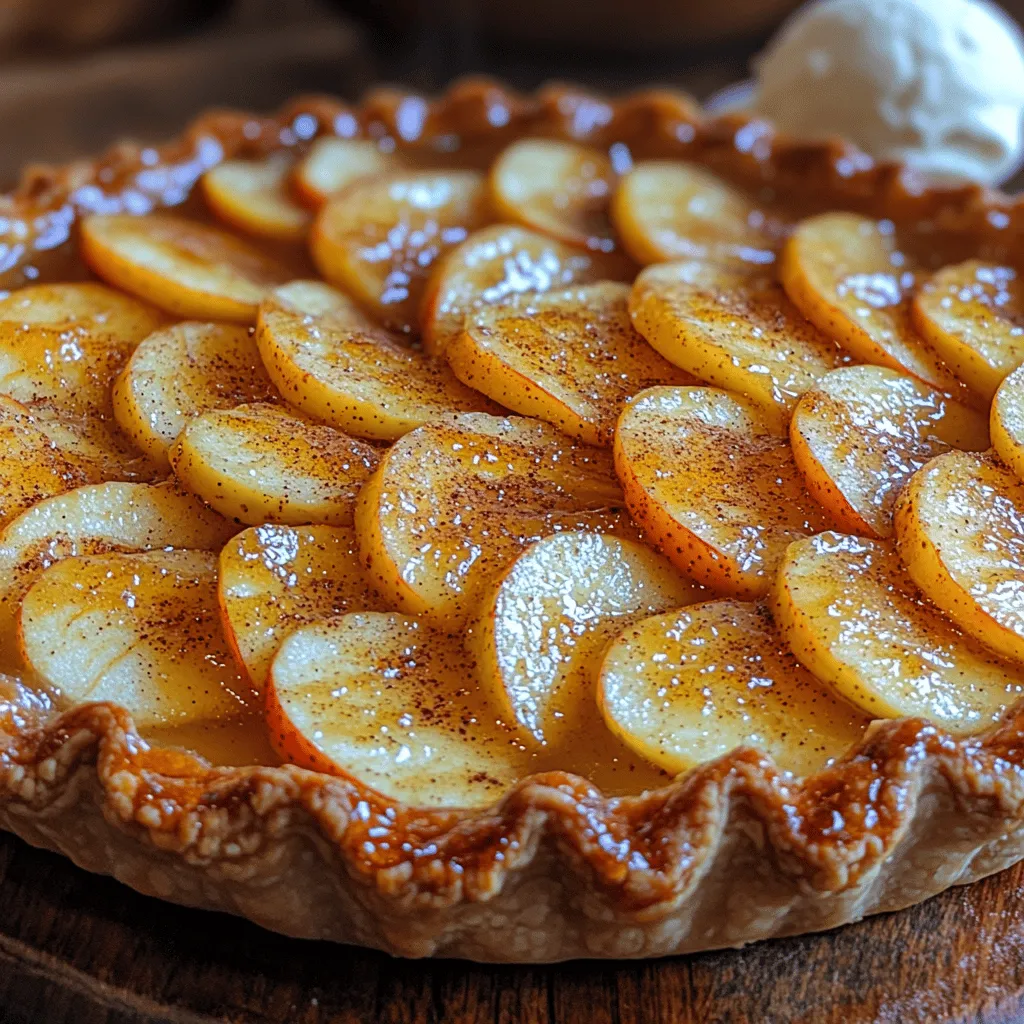
The Role of Egg Wash and Sugar
For a stunning golden crust, apply an egg wash before baking. Whisk together one egg with a tablespoon of water and brush it over the top crust. This not only enhances the color but also gives your pie a beautiful shine. Sprinkle sugar over the crust for an added touch of sweetness and a lovely crunch.
Decorative Touches
Consider embellishing your pie with decorative elements, such as crimping the edges or adding cut-outs made from leftover dough. These creative touches not only elevate the aesthetic appeal but also personalize your pie.
Baking the Classic Apple Pie
Baking your classic apple pie is the final step to creating this beloved dessert. Here’s how to achieve the perfect bake.
Detailed Baking Instructions
1. Preheat Your Oven: Set your oven to 425°F (220°C) to start. This high temperature helps create a beautifully browned crust.
2. Initial Bake: Place your assembled pie on a baking sheet to catch any drips, and bake it in the preheated oven for 15 minutes. This initial burst of heat helps set the crust.
3. Reduce Temperature: After 15 minutes, reduce the oven temperature to 350°F (175°C) and continue to bake for an additional 30 to 40 minutes, or until the crust is golden brown and the filling is bubbling.
Monitoring the Baking Process
Keep an eye on your pie as it bakes. If the edges begin to brown too quickly, cover them with strips of aluminum foil to prevent burning. Use a pie shield or make your own from foil to protect the crust while the filling finishes cooking.
Signs of Doneness
Your pie is done when the crust is golden brown and the juices are bubbling through the vents of the top crust. A good way to check the filling is to insert a knife into the apples; they should be tender but not mushy.
Cooling and Serving Suggestions
Once your classic apple pie is out of the oven, it’s essential to let it cool before slicing. Cooling allows the filling to set, making it easier to cut clean slices.
Importance of Cooling
Let your pie cool for at least 2 hours at room temperature. This cooling period not only enhances the flavor as the spices bloom but also helps the filling stabilize, ensuring that each slice holds its shape.
Ideas for Serving the Pie
When it comes to serving your apple pie, there are many delicious options:
– À la Mode: Top individual slices with a scoop of vanilla ice cream for a delightful contrast of temperatures.
– With Whipped Cream: A dollop of freshly whipped cream adds a touch of elegance and creaminess to each slice.
– Drizzle with Caramel: A drizzle of warm caramel sauce can elevate the flavors and add a delightful sweetness.
Pairing Suggestions with Beverages
To enhance your experience, consider pairing your classic apple pie with beverages such as:
– Coffee: A hot cup of coffee complements the warm spices in the pie beautifully.
– Tea: A soothing herbal or black tea can balance the sweetness of the dessert.
– Cider: A glass of sparkling apple cider or spiced cider can harmonize with the apple flavors in your pie.
Conclusion
Making a classic apple pie is not just about the end result; it’s about the experience of creating something delightful to share with family and friends. The process of preparing the filling, rolling out the dough, and baking evokes nostalgia and warmth, reminding us of home and togetherness.
As you explore the art of pie-making, feel free to experiment with different apple varieties and spices. Each combination can bring out unique flavors and textures, ensuring that your apple pie is always a fresh experience.
Whether enjoyed at a holiday gathering, a family dinner, or a quiet evening at home, a homemade apple pie is a treat that brings joy to every occasion. Embrace the tradition of baking and savor the sweet, comforting taste of classic apple pie.